Scheduling
In this chapter we will learn several techniques how to schedule activities and how to move, delete and edit already scheduled cells.
Note: The screenshots in this chapter demonstrate the most basic activities' list configuration. To learn how to create activities and configure the activities' list, please read the Activities chapter first.
Contents
- 1 Scheduling New Cells
- 1.1 How to schedule a single occurrence of an activity?
- 1.2 How to schedule a recurring activity?
- 1.2.1 How to schedule the activity after filling in the recurrence pattern?
- 1.2.2 How to schedule all activities according to their recurrence pattern?
- 1.2.3 How to schedule the same activity using another recurrence pattern?
- 1.2.4 How to reschedule the activity using a different recurrence pattern?
- 1.3 How to schedule a one-time activity?
- 1.4 How to schedule optional resources?
- 1.5 How to schedule an activity using copy/paste?
- 1.6 How to easily navigate to the schedule of an activity's resource?
- 2 Working With Scheduled Cells
- 3 Availability of Resources
- 4 Statistical Information
Scheduling New Cells
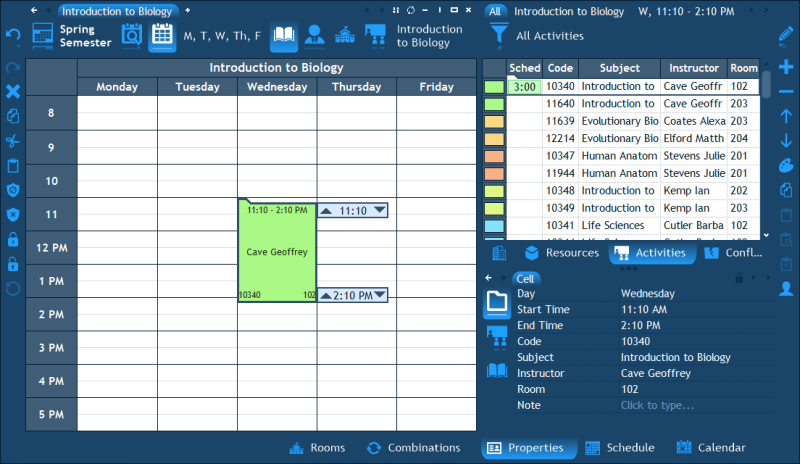
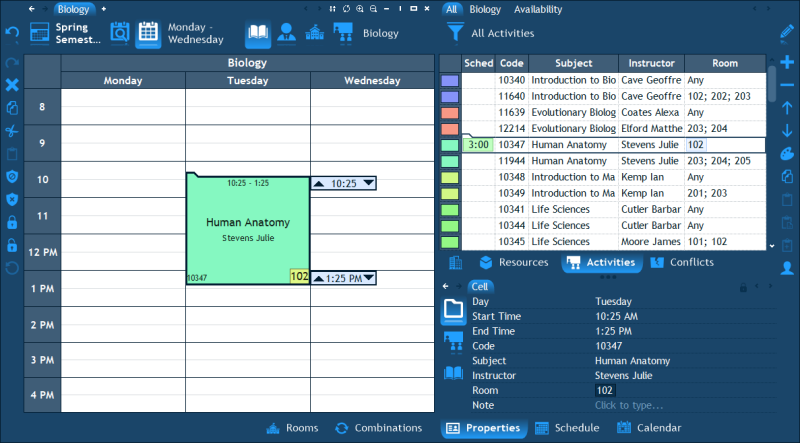
A Cell is a scheduled occurrence of an activity. This section describes various methods of scheduling new cells.
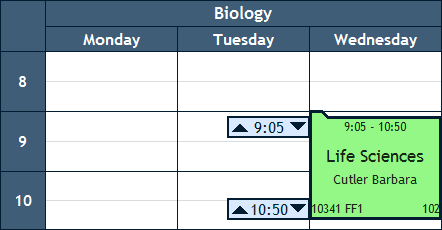
How to schedule a single occurrence of an activity?
An occurrence of an activity on a specific day and time means that all the activity's resources are booked at that time. A cell will appear in all their schedules with the details of that particular activity.
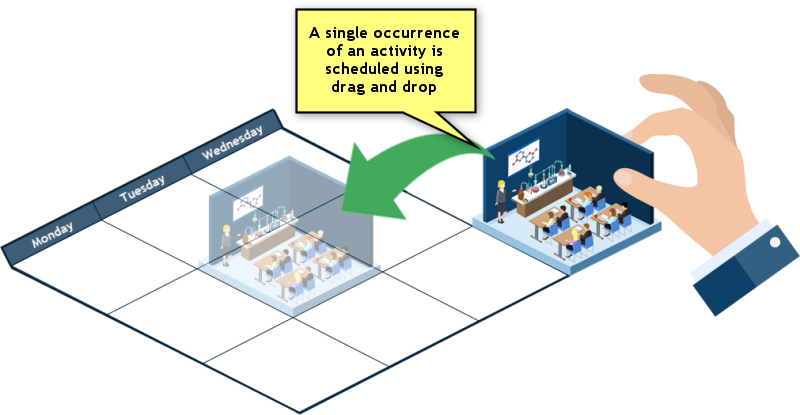
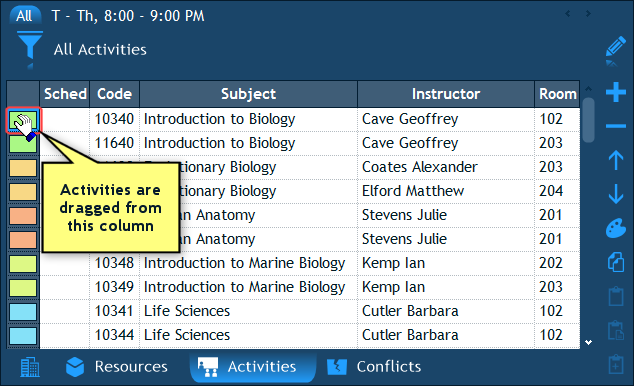
To schedule a single occurrence of an activity, you need to drag it (using the mouse) from the list of activities to the main schedule and drop it at the desired time. Let's go over the exact steps:
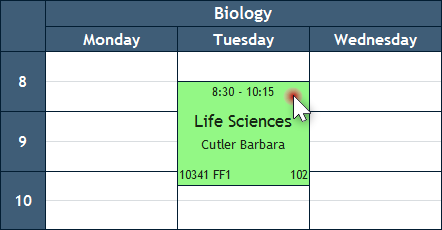
- The first step is to place the mouse cursor over the leftmost column in the activities' list - the column which displays the activity's color. Notice how the mouse cursor turns into a hand cursor:
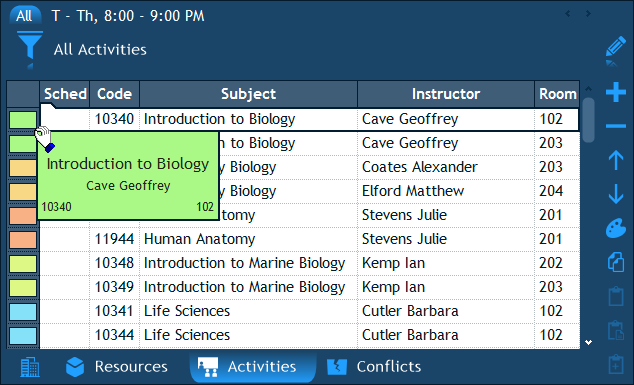
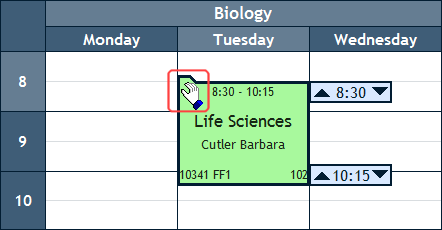
- Now press the left mouse button and keep holding it pressed. This begins the drag-and-drop operation. You will see the activity's dragged cell appear underneath the mouse cursor:
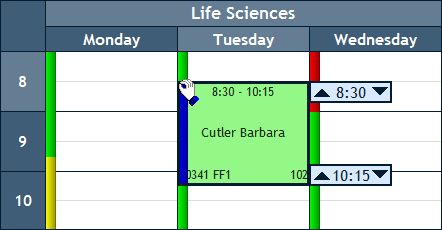
- Once you begin the drag-and-drop, the main schedule window will display what is called the conflict prediction stripes. These colored stripes inform you on which days and times the activity's resources are free (green), double booked (yellow) or blocked (red). This information helps you determine where you can drop the activity without causing any conflicts.
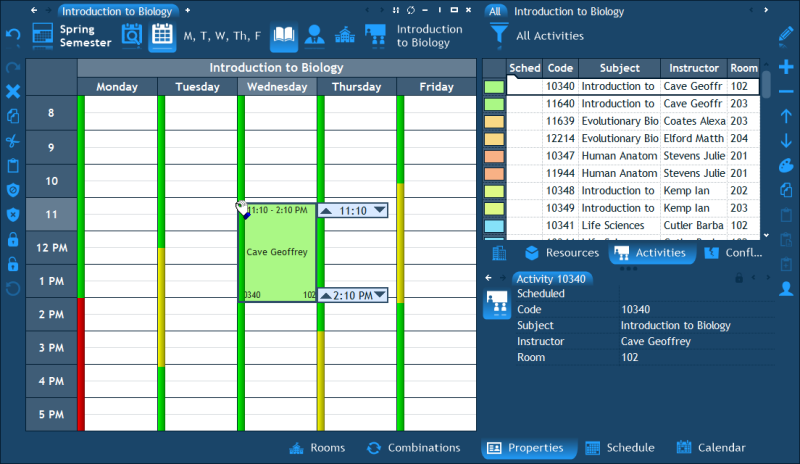
- Now that you are in the midst of the drag-and-drop, and you are holding down the mouse button, move the mouse cursor over and above the main schedule window. You will see a cell that follows the mouse anywhere you move it. When you are satisfied with the target cell's position, release the mouse button. That will schedule the activity and conclude the drag and drop operation.
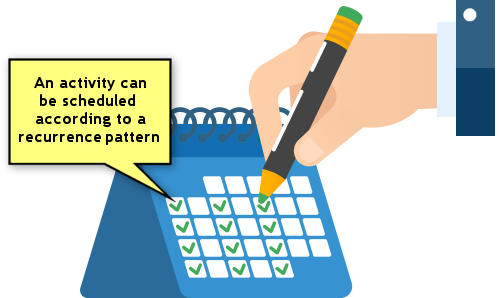
How to schedule a recurring activity?
Institutions which create a schedule in which each date in the calendar can have different scheduled activities (as opposed to a generic weekly schedule which as a whole repeats itself every week) often use a per-activity recurrence pattern to define when each activity takes place. An example of such a pattern is an activity which occurs from October 1st to December 31st only on Mondays and Thursdays from 8:00 till 10:00 AM. By defining the recurrence pattern an activity can be scheduled on many occurrences in a single operation.
The first step to define a recurrence pattern is to select the activity in the list. The Properties pane will then display the properties of that activity and at the bottom you will find an item named Recurrence Pattern. Expand that item by clicking the small plus button to the left of it. You will see the following fields:
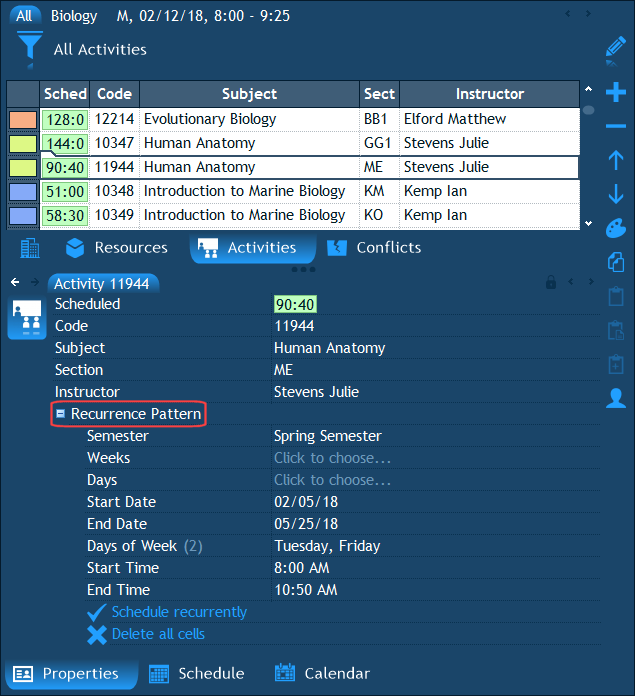
Not all these fields need to filled because some of them are interchangeable (you can even disable the fields which you don't need in the Institution pane's Properties page). Here is the meaning of each field:
- Semester - This field is useful only when a single file contains multiple semesters. When it does, this field specifies which semester(s) an activity belongs to.
- Weeks – This is a field which can be used to specify the weeks on which an activity is scheduled. They can be either generic weeks or calendar weeks. You can switch between the two types of weeks using the two tabs at the bottom of the popup window: "Weeks" and "Calendar". When you need to select multiple weeks in the "Calendar" tab, use the Ctrl key on the keyboard for multiple selection. If you fill in this field, you should also fill in the "Days of Week" field to specify on which weekdays exactly to schedule the activity.
- Days – Here you can specify the exact days (generic) or dates (calendar) on which to schedule the activity. Use the two tabs: "Days", "Calendar" at the bottom of the popup window to toggle between generic or calendar days. If you use this field, there is no need to fill in the "Days of Week" field because using this field you specify the days explicitly.
- Start Date and End Date – These two fields can be used instead of the Weeks and Days fields to specify a range of calendar dates. If you fill in this range, you should also use fill in the "Days of Week" field to narrow down the range to specific weekdays.
- Days of Week – Use this field to specify on which weekdays to schedule the activity.
- Periods – If your time scale defines periods, use this field to specify on which periods to schedule the activity.
- Start Time and End Time – The activity will be scheduled at this time and with this duration repeatedly during the entire recurrence time range.
How to schedule the activity after filling in the recurrence pattern?
Important: Filling in the above properties does not schedule the activity yet. To actually schedule it, you must click the link "Schedule recurrently" which is located at the bottom of the recurrence pattern:
![]()
How to schedule all activities according to their recurrence pattern?
If you have multiple activities selected in the activities' list, clicking the "Schedule recurrently" link schedules all the selected activities - each according to its recurrence pattern. So to schedule the entire list of activities in this way, you need to first select them all (by selecting the first and then selecting the last while holding down Shift on the keyboard or just by press Ctrl+A on the keyboard) and then click "Schedule recurrently".
How to schedule the same activity using another recurrence pattern?
Suppose you would like to schedule the same activity in a range of 3 months but on Mondays from 9:00 to 10:00 whereas on Tuesdays from 10:00 to 11:00. In this situation you should repeat the above process twice. First, fill in the Mondays' recurrence pattern, type start and end times 9:00 to 10:00 and click the link "Schedule recurrently". Afterwards, change the recurrence pattern to Tuesdays, type the new start and end times: 10:00 and 11:00 and click the link "Schedule recurrently" again. That's it. Notice how the recurrence pattern in itself is meaningless unless you click the link "Schedule recurrently". After you click the link and the activity gets scheduled, changing the recurrence pattern does not have any effect on the already scheduled cells of the activity.
Note: If you need to "preserve" both recurrence patterns as part of the activity (have them saved and remembered by the software), you must create a duplicate activity (using copy/paste) because an activity saves only the last recurrence pattern that you filled. So if you have two activities, each can hold a different recurrence pattern.
How to reschedule the activity using a different recurrence pattern?
To reschedule the activity, you need to click the link "Delete all cells" to delete the existing cells of the activity, then fill in the new recurrence pattern and then click the "Schedule recurrently" link to apply the new pattern.
How to schedule a one-time activity?
There is a comfortable way to both create and schedule a new activity in a single operation, which we have not mentioned so far. This is especially useful for scheduling one-time activities (activities which have a single occurrence) because it does not require the activity to be entered in advance in the activities' list (like you normally do with planned activities). Instead, it is created on-the-fly and scheduled immediately thereafter.
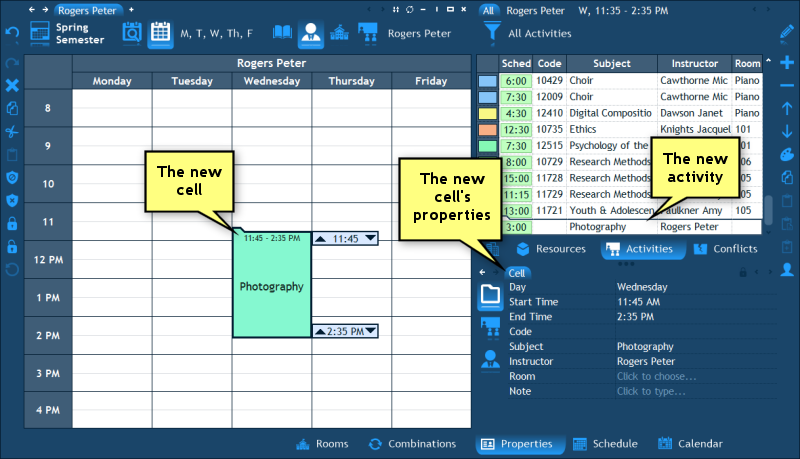
To create and schedule a new activity in this manner, first you need to select an empty range of cells in some resource's schedule - that would be the time range in which the new activity is going to be scheduled. Once you do that, the Properties pane will display the properties of a New Cell:
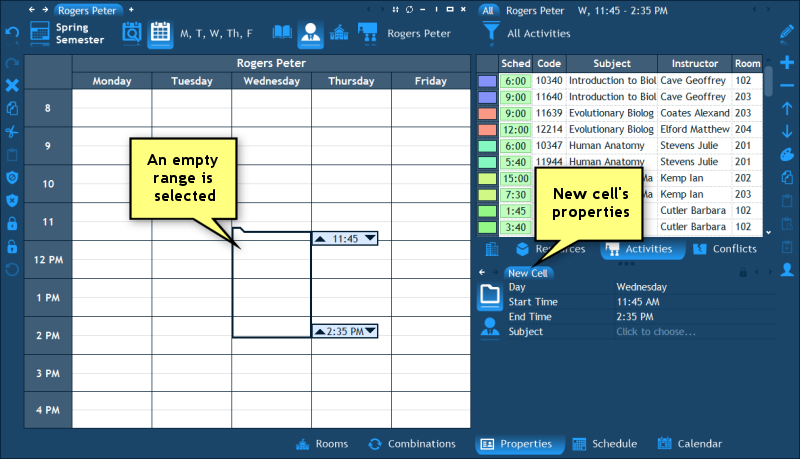
All you have to do now is pick a Subject in the Properties pane:
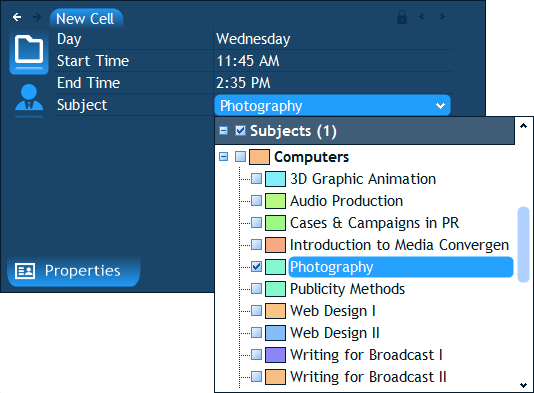
By picking a subject you are creating a new activity which involves two resources: the resource whose schedule you now see on screen and the subject that you have just selected. This activity will immediately be scheduled in the selected time range. It will also be automatically added to the activities' list. In addition, the new cell's properties will be displayed in the Properties pane, where you can continue to fill in the other resources of the cell. For example, you can choose a room, add a note etc.
How to schedule optional resources?
Reminder: As we have explained before, when an activity allows the selection of optional resources per cell, each cell of the activity can have a different chosen resource (or several chosen resources). For example, if an activity has 3 possible rooms in which it can be scheduled, 3 occurrences of the activity can be each held in a different room. As you remember, the optional resources were defined either by choosing the option "Any of the selected" at the bottom of the popup list in which you select the activity's resources, or by choosing "Any" (in which case any relevant resource is a valid option).
Now, when an activity allows optional resources, scheduling the activity leaves the cell in a sort of unfinished state because a vital resource is still missing and needs to be chosen. The program will display the word None near the missing resource in the cell's properties after scheduling the activity, like this:
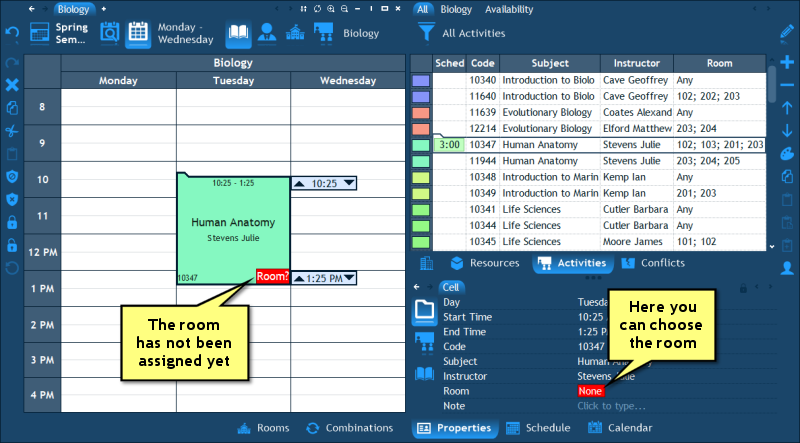
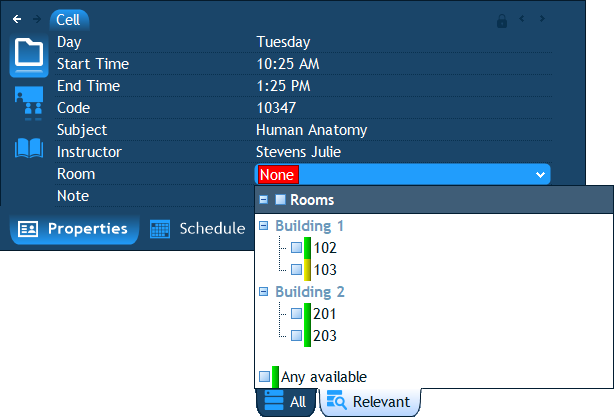
The actual choice of a resource is done in the Properties pane, where the program will display the word "None" on a red background near the missing resource. When you are choosing a resource, the program helps you by showing which resources are free with green stripes near their names, and you can also have the program automatically select an available room by selecting "Any Available" at the bottom of the popup list:
After choosing a resource, the cell will display its name and the red warning will disappear:
What if all the relevant rooms are booked?
If all the optional rooms of an activity are already booked at the time the activity is scheduled, the program can help you find possibilities to free them by moving their occupying activities into other rooms. All you need to do is click the Combinations tab below the main schedule, and if such possibilities exist, the program will find them.
These possibilities (combinations) will be displayed to the right of the main schedule - in a form of thumbnails. Each thumbnail represents one possibility to schedule the selected activity into an accommodating room, while moving the activity that is already scheduled in that room to another room (and possibly by moving the other room's activity too and so on). When you place the mouse cursor over a thumbnail, the "moves" of the combination are depicted using arrows in the Rooms pane (below the main schedule):
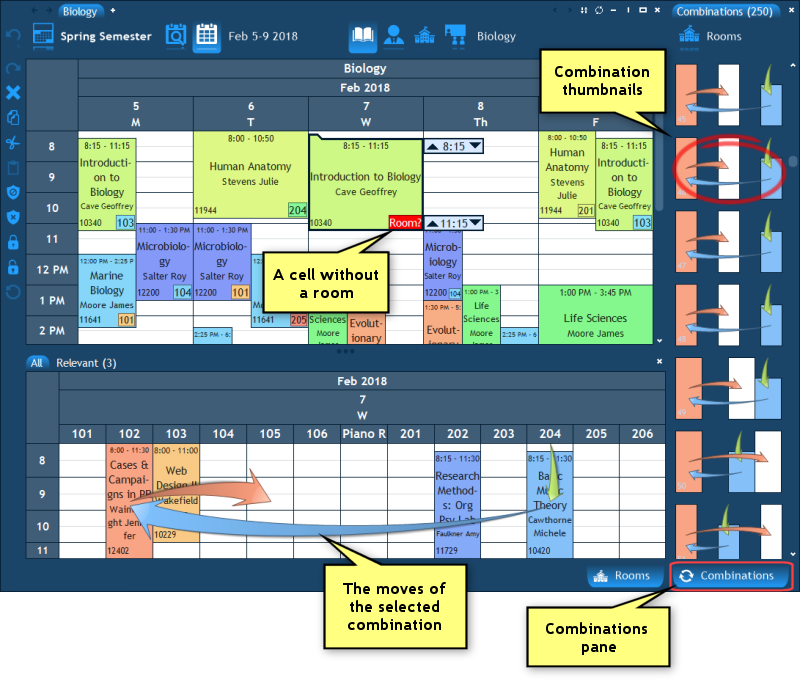
In the example above the activity is scheduled in room 204, the activity which is in 204 is moved to room 102 and the activity in 102 is moved to 105. The program always makes sure that the target room is suitable for the activity - it's either one of the explicitly chosen rooms for the activity, or, if none were chosen, it's a room that is both large enough and also matches the subject of the activity.
To apply a combination, you just need to double click its thumbnail.
Note: You can also use the Combinations pane to reschedule an activity into a different room (even when it's already scheduled in one). Select the activity's cell and click the Combinations tab. You will then see possibilities which relocate the activity into other rooms.
How to schedule an activity using copy/paste?
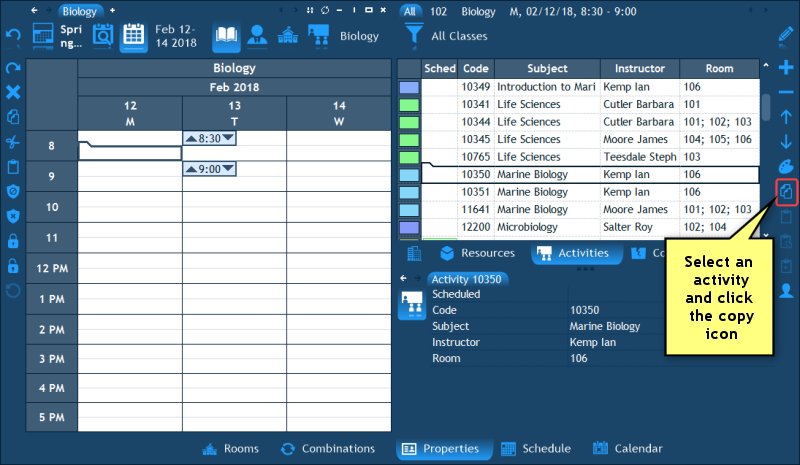
Another way of scheduling one or more occurrences of an activity is simply by using copy/paste. The process is simple: you select an activity in the list, copy it, then select a time range in the main schedule and paste. Let's demonstrate.
First, select an activity by clicking it. Then, click the Copy icon in the right hand side toolbar, or press Ctrl+C on the keyboard:
The next step is to select the time range in which the activity will be pasted. You can select a time range which includes more than one day or you can paste on each day separately.
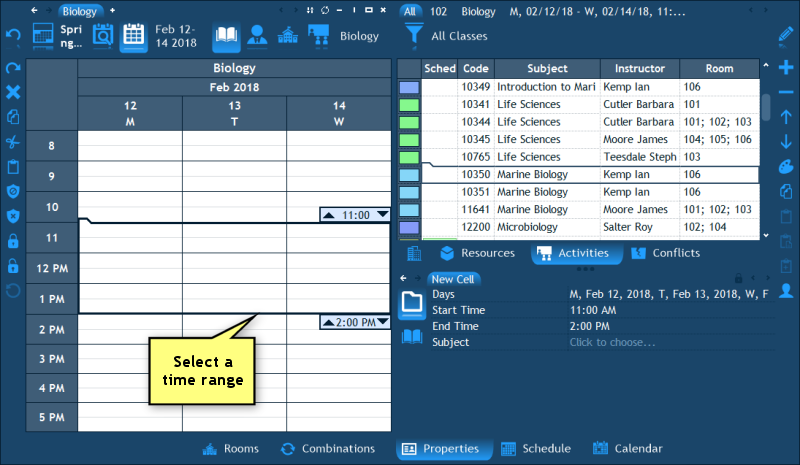
Finally, click the Paste icon in the left hand side toolbar, or press Ctrl+V on the keyboard:

Instead of using the navigation pane (at the top of the main schedule) to select whose schedule is now displayed on screen, there is another way to accomplish this which is especially comfortable when you are in the process of scheduling activities: all you have to do is double click a resource's name in the activities' list. That resource's schedule will then be immediately displayed in the main schedule:
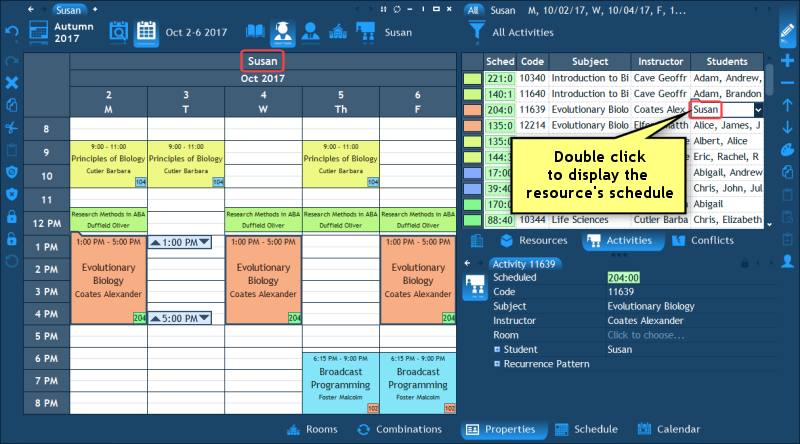
Note: If you double click a cell in the activities' list which does not contain any resource but instead contains a textual property of the activity or some statistical data (such as the "Scheduled" column), the activity's schedule will be displayed.
Working With Scheduled Cells
This section describes how to move scheduled cells, duplicate, resize and delete them.
How to move a cell?
Moving of cells is also accomplished using drag and drop. However, it requires that a cell be selected prior to moving it.
- A cell is selected simply by clicking it:
- When a cell is selected, you will see a small tab appearing at its top left corner. This tab is very important because that is where you need to place the mouse cursor in order to move the cell. When the mouse is above the tab, the cursor will change into a hand cursor and when it does, it means that you can start dragging the cell:
- To start dragging, press the mouse button and hold it pressed. You will see that the schedule displays the colored conflict prediction stripes just like it did when you were dragging an activity.
- Move the mouse over to the destination time and release the mouse button to complete the operation.
How to copy a cell?
Just like you can move a cell using drag and drop, you can duplicate it. To accomplish this, just hold down the Ctrl key on the keyboard while you are dragging the cell. You will see that the old cell remains in place and a new cell which is a duplicate of the original cell is the one being moved around when you are dragging:
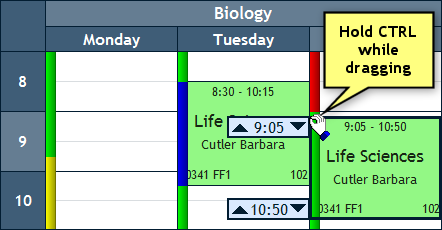
Tip: You can speed up the process of scheduling the same activity on multiple occurrences using this Ctrl key technique. Remember that the first time you drag-and-drop an activity, you start from the Activities pane which resides at the right corner of the screen. The second time, however, you no longer need to go back to the Activities pane to drag-and-drop it. What you can do instead, is just hold down the Ctrl key on the keyboard and duplicate the previous cell that you have scheduled. If you do it like this, you don't have to travel a long distance with the mouse back and forth to the Activities pane.
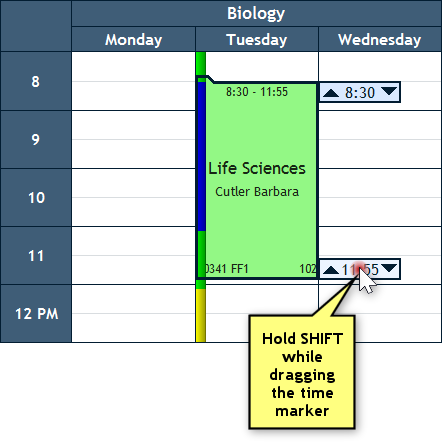
How to resize a cell?
If you hold down the Shift key on the keyboard while dragging a time marker up or down, the cell itself will be resized. For example, if you select a cell which is scheduled from 8:30 to 11:05, hold down the Shift key on the keyboard and drag the bottom time marker down, the cell will start to increase in length to 11:10, 11:15, etc.
Note: An alternative way to resize a cell is using the Properties pane. Just select the cell, edit its Start Time or End Time properties and press Enter. The only downside of this method compared to the one described above is that here you don't get to see the colored conflict prediction stripes.
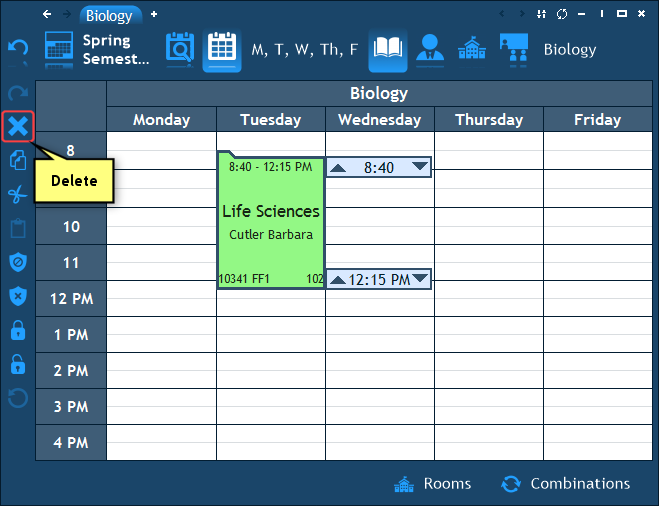
How to delete cells?
The deletion of cells is quite straightforward: what's selected is what will be deleted. Once you have selected the cell(s) to delete, press the Delete button on the keyboard or click the "X" button in the left toolbar and the cell will be deleted. Remember that you can always un-delete it using the Undo button.
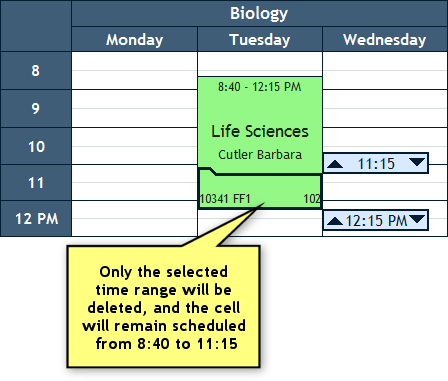
What's also worth emphasizing is the ability to delete partial cells. Remember that the time markers that appear next to the selected cell allow you to change the selected time range: if you move the top marker down or the bottom marker up, only a fraction of the cell will become selected. At this point, if you press the Delete button, only that fraction of the cell will be deleted. The remaining part will be left as it was.
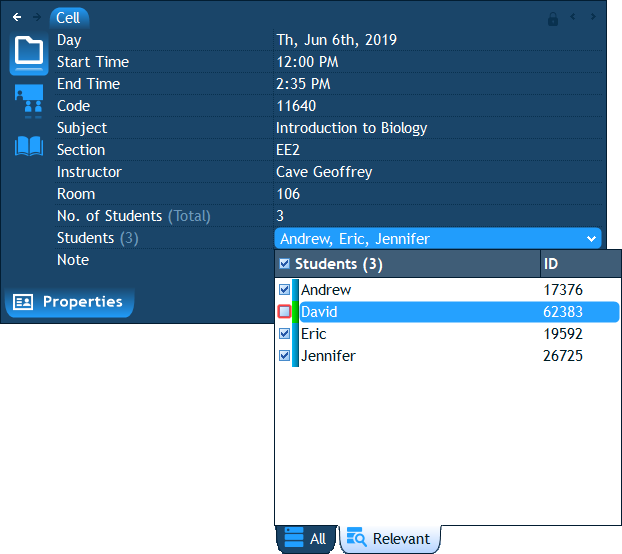
How to modify the resources of a cell?
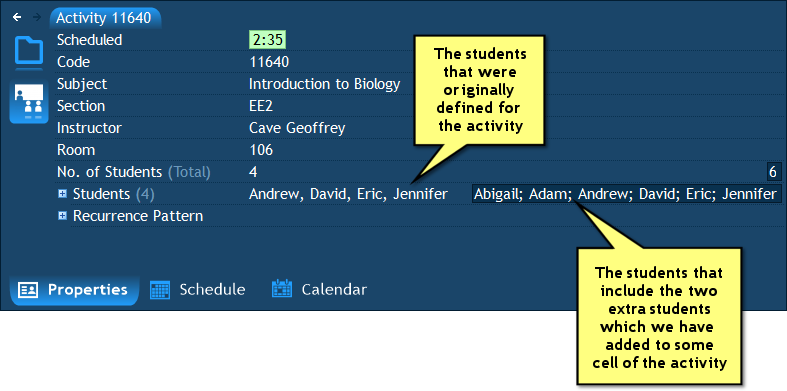
Suppose an activity is scheduled on multiple occurrences throughout the semester with a constant list of 10 students. However, on one particular occasion, some student is planned to be engaged in some other event and thus will not be able to attend the usual activity. In this situation we would like to modify the list of students, but only of that particular cell of the activity - without affecting the other occurrences of the activity. All you need to do in this case, is select the cell, and then edit the list of students in the Properties pane. Deselect the relevant student in the popup list by clicking the check box near his/her name, and the student will be pulled out of that specific occurrence (cell) of the activity:
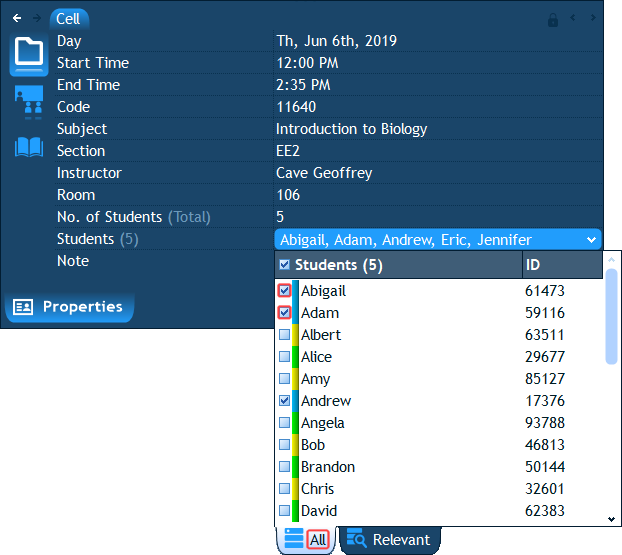
If you would like to add a student (or any other resource for that matter) to the cell (instead or in addition to pulling out an existing one), just click the tab named "All" at the bottom of the above popup list, and then select the students you wish to add by clicking the check boxes near their names:
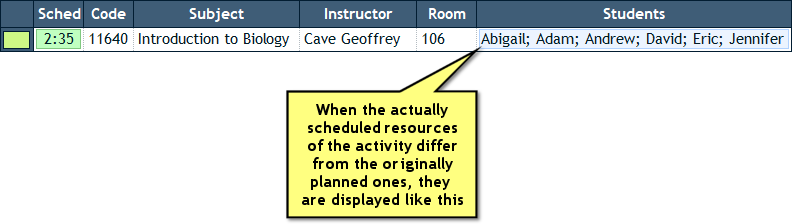
Note that once you add a student (or any other type of resource) who was not a part of the original activity, to some specific cell of that activity using the method explained above (using the "All" tab in the properties' popup list), the name of the resource you have added will be reflected in the activities list and in the properties of that activity. Here is how:
- In the Activities list - when the Editing mode is turned off (the pencil button at the top right corner of the screen is deselected), the activity will display the actually scheduled resources, which are not necessarily the originally planned resources of the activity. For example, if we have added two external students to some particular cell of the activity, the list of the activity's students will include the external students and be displayed with a light-blue background like this:
- In the Properties pane - the properties of the activity will include both the originally planned activity's resources and the ones that contain all the resources who are actually scheduled. They will be displayed in two separate values, one next to the other (first the planned resources then the actually scheduled ones), like this:
How to work with all the activity's cells throughout the semester?
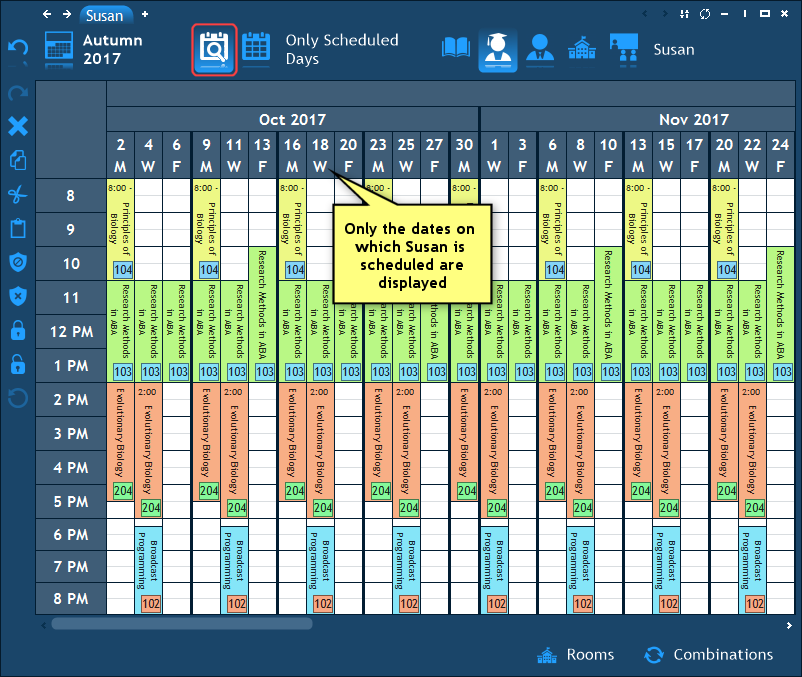
When you need to reschedule an activity that is scheduled on many occurrences throughout the semester, you do not need to do this separately for each cell - because there is a quicker way to move or delete all the activity's cells at once.
If you remember, the navigation pane contains a button called "Only Scheduled Days". If you click that button while viewing some resource's schedule, the program automatically calculates all the days on which that resource is scheduled and switches to displaying the schedule of only those days:
Now, if you also remember, double clicking any activity's cell in the schedule makes the program select all the cells of the same activity. So if you now double click the cell of some activity, all its cells throughout the semester will become selected (because the schedule contains all the occurrences of this activity):
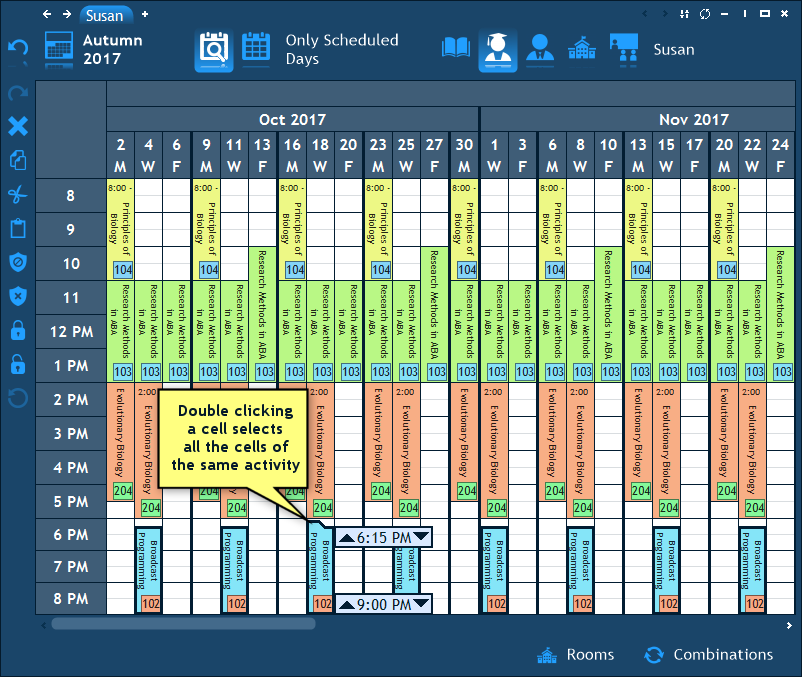
Now that all the cells are selected, you can drag-and-drop them, delete them and edit their properties - and all the cells will be affected.
Tip: If you hold down the Shift key while double clicking a cell, only the activity's cells which are scheduled at exactly the same time (same start and end time) will be selected.
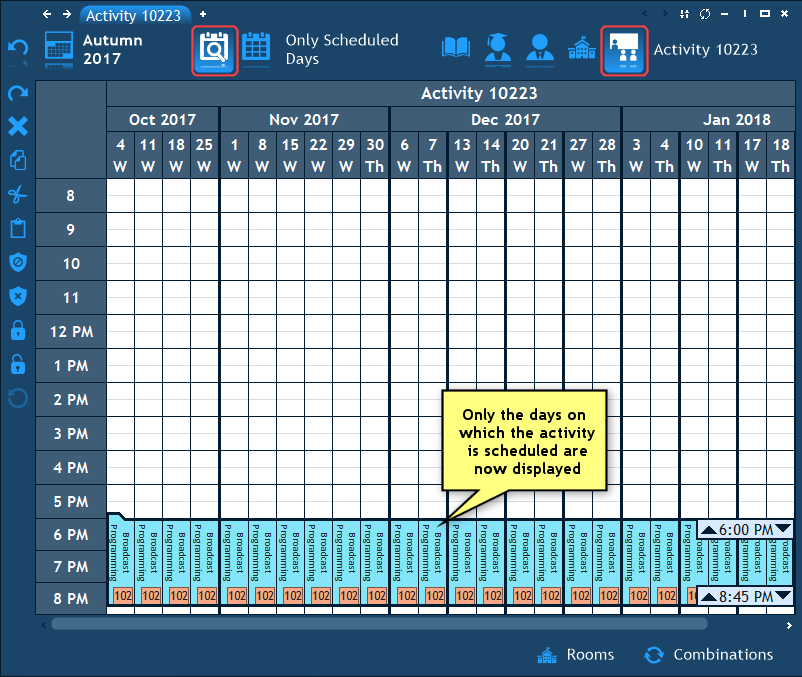
By the way, if you now click the Activity icon at the navigation pane, you can focus only on the cells of that particular activity (instead of seeing all the resource's cells). The program will leave only the dates on which the activity is scheduled:
Availability of Resources
Due to many possible reasons, a resource may not always be available for scheduling. For example, an instructor having a day off on a specific weekday; or a room being allocated to some extra curricular activity at specific times. When this kind of information is known in advance, it is possible to enter it into the program so that it would not let you schedule an activity at a time at which a resource is unavailable.
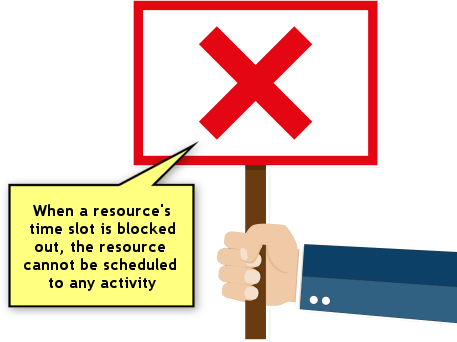
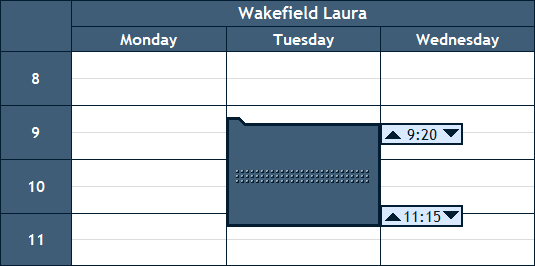
The times at which a resource is unavailable are marked by blocking out the relevant cells. Nothing can be scheduled at a blocked cell without raising a conflict.
To block out cells, select the relevant time range and then either choose "Edit", "Block" in the main menu; or click the block button in the left hand side toolbar; or press the big plus button on the keyboard. A blocked cell looks like this:
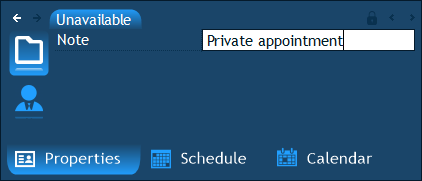
You can also add a note to a blocked cell in the Properties pane:
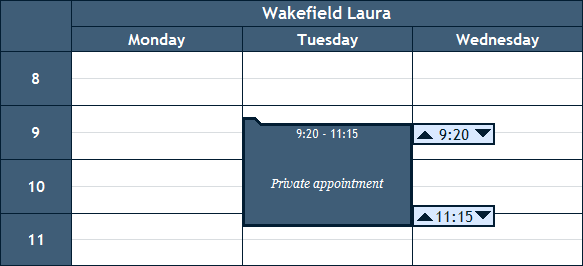
A blocked cell with a note looks like this:
How to check which resources are available at a particular time?
If you need to know which resources are free at a particular time, all you need to do is first select the time range in the main schedule and then click the Availability tab above the list of resources. The program will then show a colored stripe near each resource, indicating whether the resource is free (green), busy (yellow) or blocked (red):
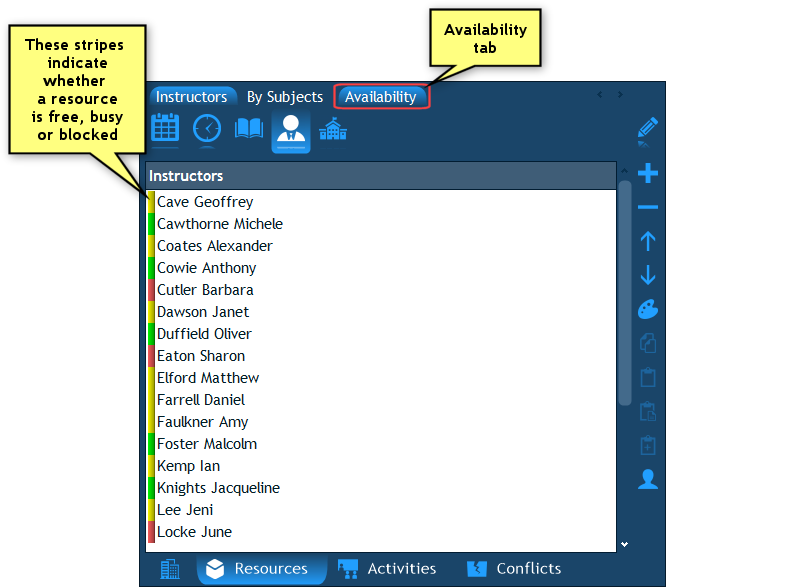
Tip: If you select several time ranges (using Ctrl+Click), the program will calculate the availability information for all of them, i.e. the resources with the green stripe will be those which are free at all the time ranges you have selected.
To remove the availability stripes, click the "Availability" tab again (this tab behaves like a check box).
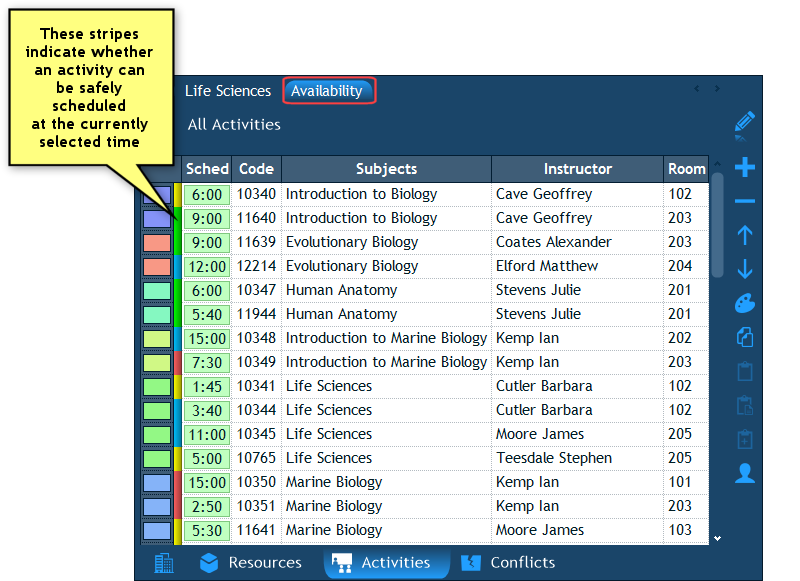
How to check which activities can be scheduled at a particular time?
In the same manner that you can check which resources are available at the time range that you have selected in the main schedule, you can do the same with activities. If you click the Availability tab above the activities' list, the program will display a colored stripe near each activity, indicating whether the activity can be scheduled at the selected time range without causing any conflicts (i.e. all its resources are free at that time, indicated by a green stripe) or whether at least one of its resources is busy (yellow) or blocked (red). If the activity is already scheduled at that time, a blue stripe is displayed.
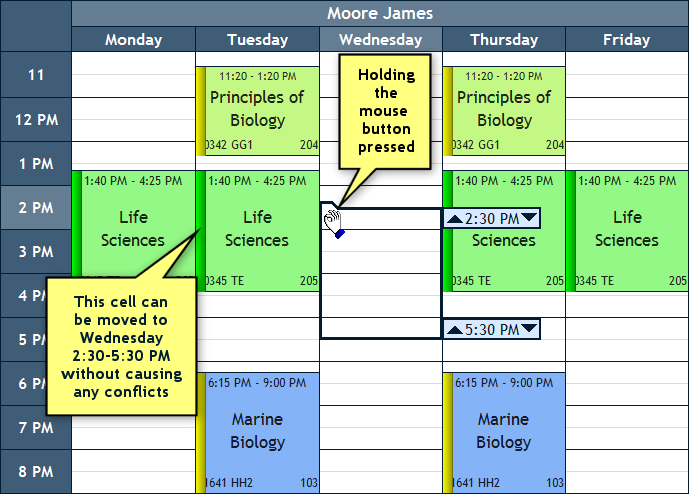
How to check which scheduled activities can be moved into an empty cell?
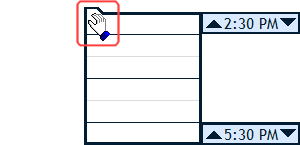
In case you need to know which of the visible scheduled activities can be moved into an empty cell, all you need to do is first select the empty time range and then place the mouse cursor over the tab at the top left corner of the cell. The mouse cursor will turn into a hand cursor:
Now press the mouse button and hold it pressed. You will see colored stripes appear at the left side of each scheduled cell. A green stripe means that the cell can be moved into the empty cell without causing any conflicts and a yellow stripe means that moving the cell would cause a conflict:
Statistical Information
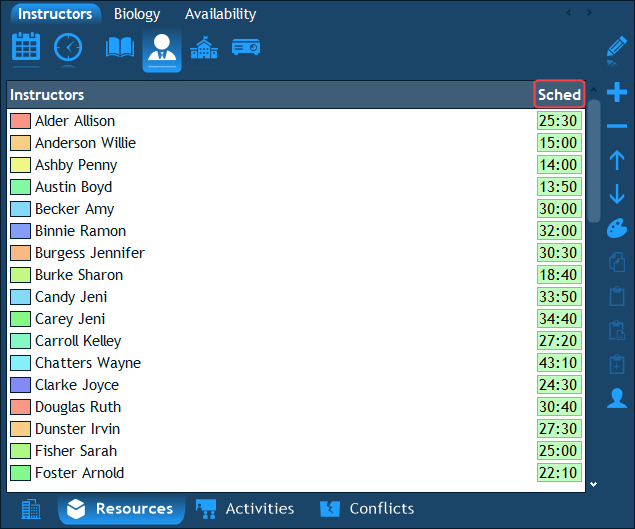
By now you must have noticed the column named "Scheduled" that appears at the top left corner of the activities' list (sometimes appears only as "Sched" because the column is narrow) and which sums up the total scheduled quantity of hours (or periods) for each activity. There are several aspects of this column which we would now like to explain.
How can I see the total scheduled quantities for resources?
Just like you can see the scheduled quantity of activities, you can have the program sum it up for resources. All you need to do is enable the "Scheduled" property for the relevant type of resource in the Institution pane's Properties page. For example, to display scheduled quantities for instructors, enable the "Scheduled" property under "Instructor":
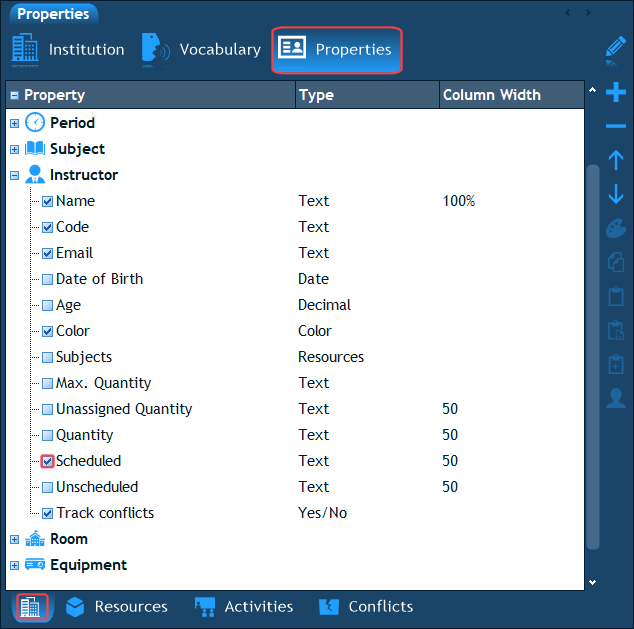
Once you do that, the list of instructors will include the "Scheduled" column which displays each instructor's total scheduled quantity (either in hours or in periods):
Note: The scheduled quantities will also be shown in every popup list of instructors throughout the program.
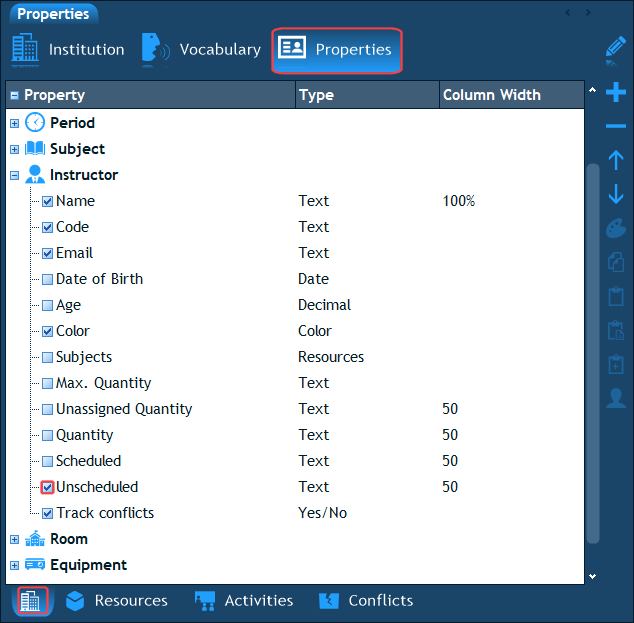
Is it possible to display what's left to schedule instead of what's scheduled?
Yes, if you go to the Institution pane's Properties page, and expand the "Activity" item, you will see a property named "Unscheduled". The "Unscheduled" value is equal to "Quantity" minus "Scheduled". So if you toggle this property on, you will see what's left to schedule for each activity.
If you would like the "Unscheduled" column to be the first column (just like "Scheduled") you need to move the "Unscheduled" property to the top of the list by selecting it and then clicking the arrow up icon several times in the right hand side toolbar.
Does the "Scheduled" column sum up quantity per week or per semester?
The default is per week but there are two other options: sum up per day and sum up per semester. This is configured in the Institution pane's Properties page by clicking the "Scheduled" property and editing its "Time Range" field (below the list):
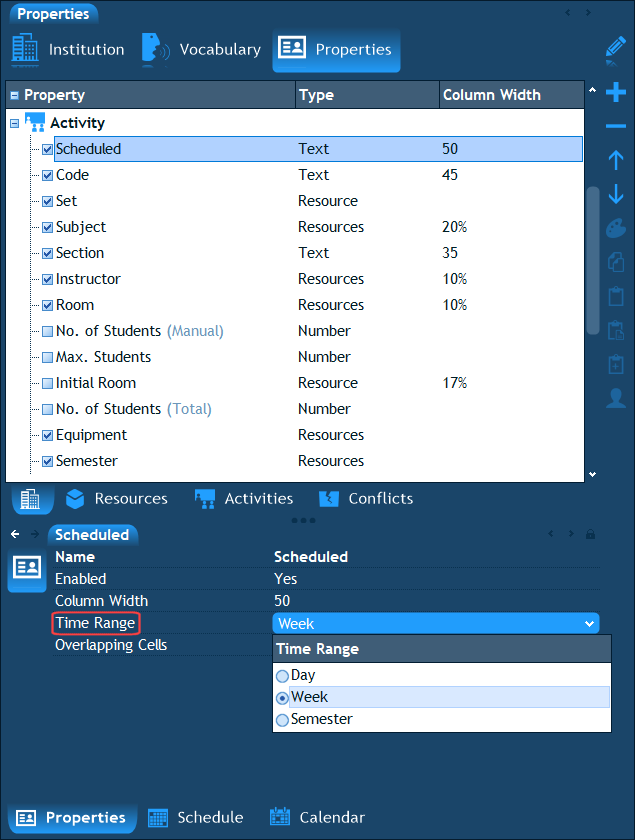
When the selected options are "Day" or "Week", the quantities are summed up for the days/weeks that are currently visible on screen (the ones that you choose in the navigation pane). Every time you browse to a different week, the numbers in the "Scheduled" column will be updated.
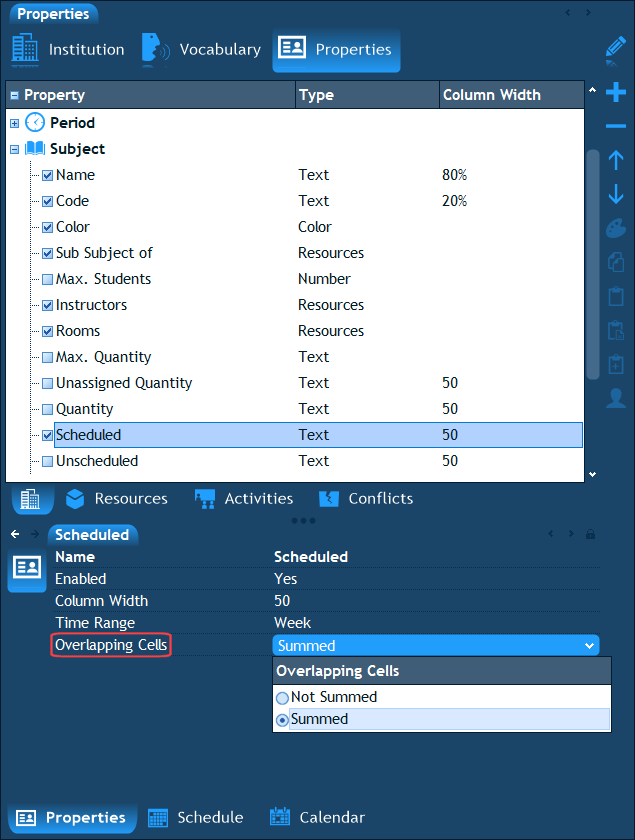
Are two overlapping cells counted as 1 or 2?
As you know, groups, subjects and rooms are resources which may contain "sub-resources". For example, a group may contain several sub-groups. When two sub-groups are scheduled at the same time (a situation which is not considered as a conflict unless they have students in common), they both appear in the parent group's schedule which results in the parent group having 2 cells scheduled simultaneously. In such a scenario the question is: when the program sums up the parent group's scheduled quantity, does it add 1 or 2 hours to the sum (given that both cells have a length of 1 hour)?
The answer is, that by default, the program adds 1 hour. However, you can configure the program to sum up all the cells, even the ones which overlap. To do this, go to the Institution's pane Properties page and under the relevant resource type select the "Scheduled" property. Look below, in the properties pane, and you will see the property: "Overlapping Cells". The default value of this property is "Not Summed", but if you change it to "Summed" the program will be summing up all cells:
The next chapter: Conflicts.