
Resources
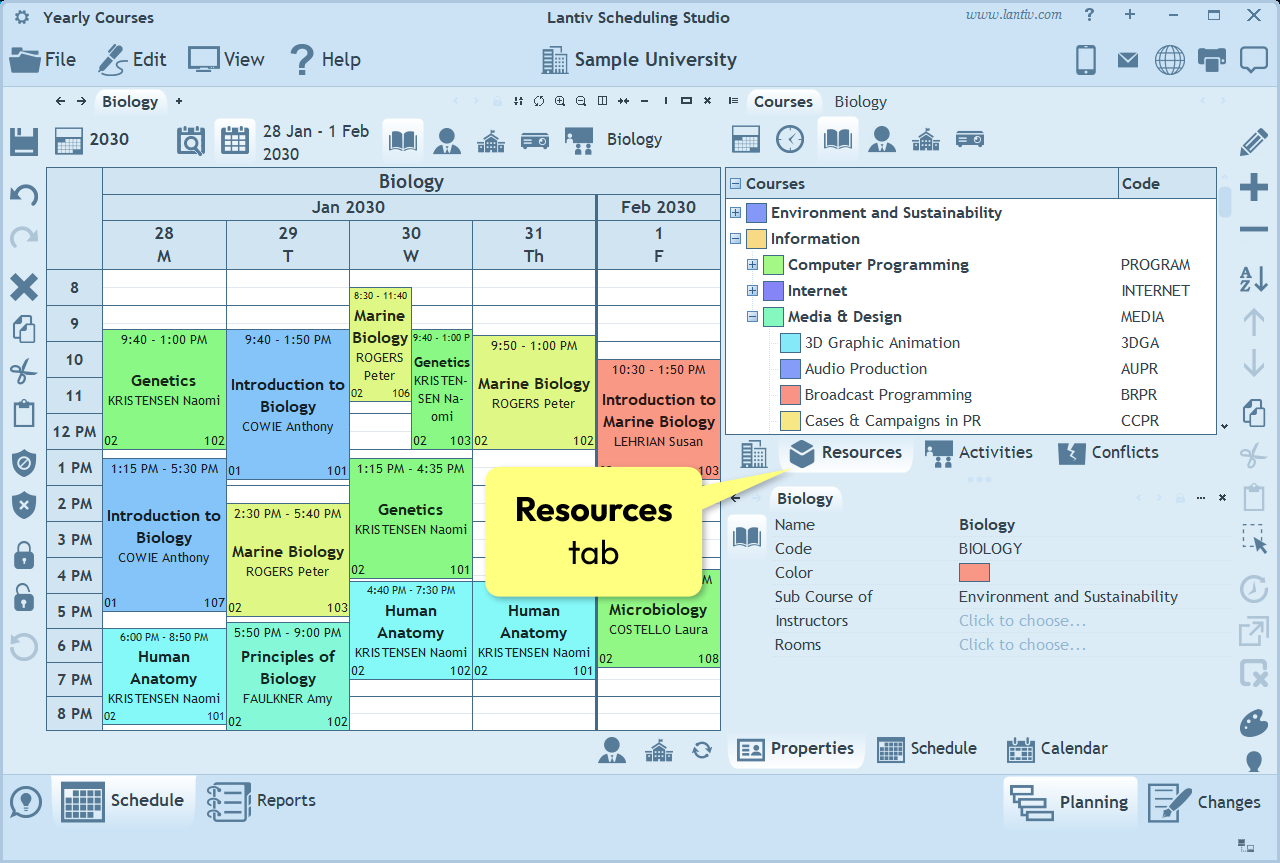
The Resources pane is where you define all the entities used for scheduling, including courses, groups (or programs), students, instructors, rooms, and equipment. It also contains the time-related resources—such as terms, generic (recurring) weeks and days, and time scales—that form the foundation of the timetable. The Resources pane is located in the second tab immediately after the Institution tab.
Contents
Resource Types
The Resources pane is divided into several pages, one for each resource type. You can use the toolbar at the top of the pane to navigate between these pages.
Time resources (the first two buttons):
- Terms, generic (recurring) Weeks and Days
- If the schedule is calendar-based, there is no need to define generic weeks and days—only the start and end dates of each term
- Time Scales and Periods
- If the schedule uses flexible times instead of periods, there is no need to define periods—only the start and end times of the time scale.
Conceptual resources (the third button):
- Courses
Physical resources (starting from the fourth button):
- Groups or Programs
- Students
- Instructors
- Rooms
- Equipment
Courses, groups, and rooms can be organized hierarchically into multiple categories and subcategories. For example, courses can be categorized by area of expertise and department, programs by year, level, and field, and rooms by building and campus.
Note: If there is a resource type that you do not need to schedule (for example, Equipment), you can disable it in the Institution pane on the Vocabulary page. Once disabled, it will no longer appear anywhere in the program. Some screenshots in this user's guide were taken from sample files where certain resource types are disabled. As a result, not all eight resource buttons may be visible in every screenshot.
What is the difference between resources and activities?
Resources themselves are not scheduled directly—you never schedule a standalone resource. Instead, scheduling is done through Activities. An activity is created by associating one or more resources together. An activity may include resources of any type and does not have to include all resource types. Even when only a single resource needs to be scheduled, it must still be included in an activity. When an activity is scheduled, it appears in the timetables of all participating resources. The process of creating activities is explained in the next chapter.
Terms, Weeks and Days
The first page in the Resources pane is the Days page.
The program supports two types of days: calendar dates and generic (recurring) days. Let's explore the different scheduling scenarios and see how each can be set up in the software.
Scenario 1: Calendar Dates
The first scenario is scheduling using actual calendar dates. This is suitable for colleges and universities where classes start and end on different dates. For example, one class may begin on September 10th and another on September 26th. In this type of schedule, each day can be different, so one week does not necessarily repeat the next.
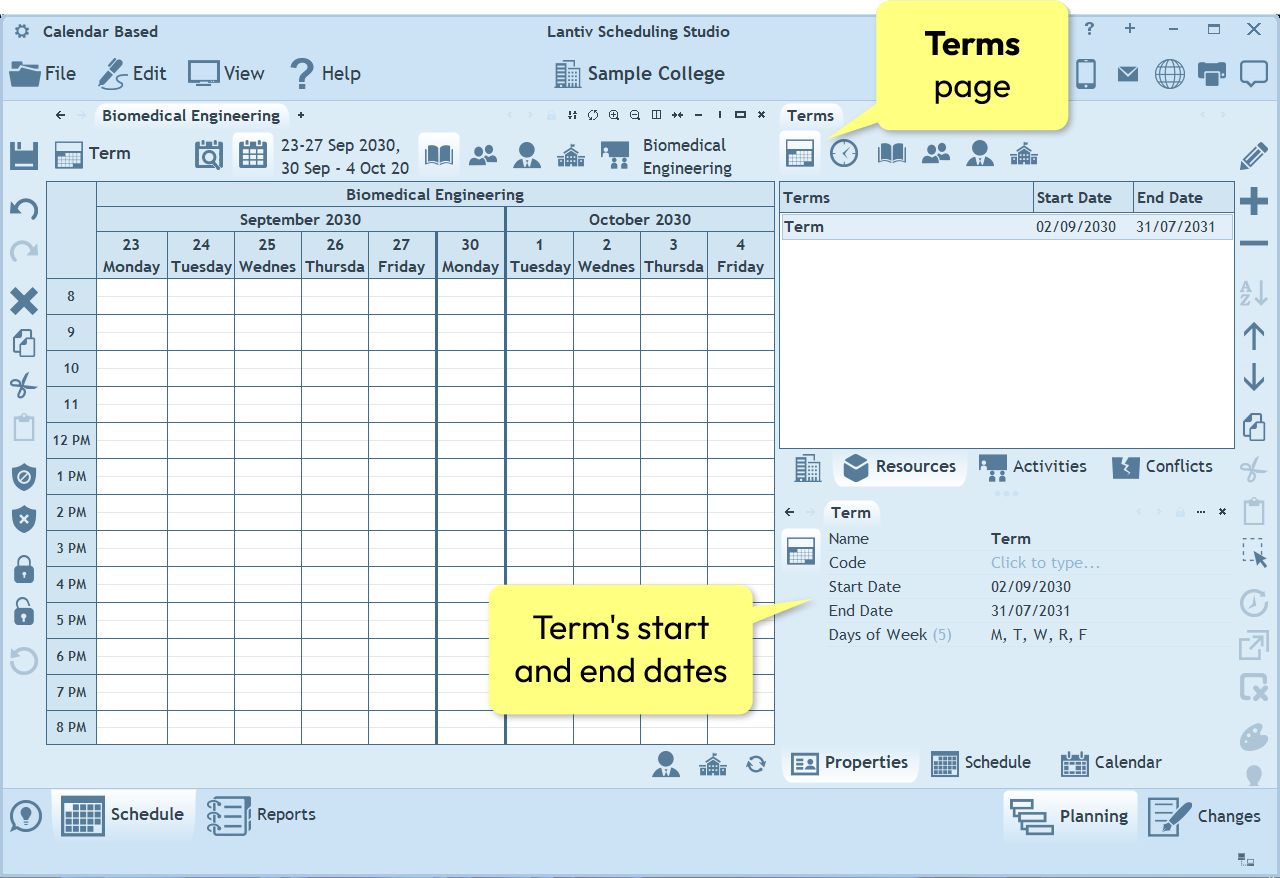
In calendar scheduling mode, there is no need to add any days to the list. Simply specify the term's start and end dates in the term's properties (the program automatically creates one term by default). To do this, select the term and edit its start and end dates in the Properties pane.
Scenario 2: Recurring Days and Weeks
The second scenario is scheduling activities on generic, template-like days. A generic day is not tied to a specific calendar date. Instead, the activities scheduled on it repeat throughout the term on multiple dates. They may recur once a week, several times a week or once every two or more weeks.
Weekly Schedule
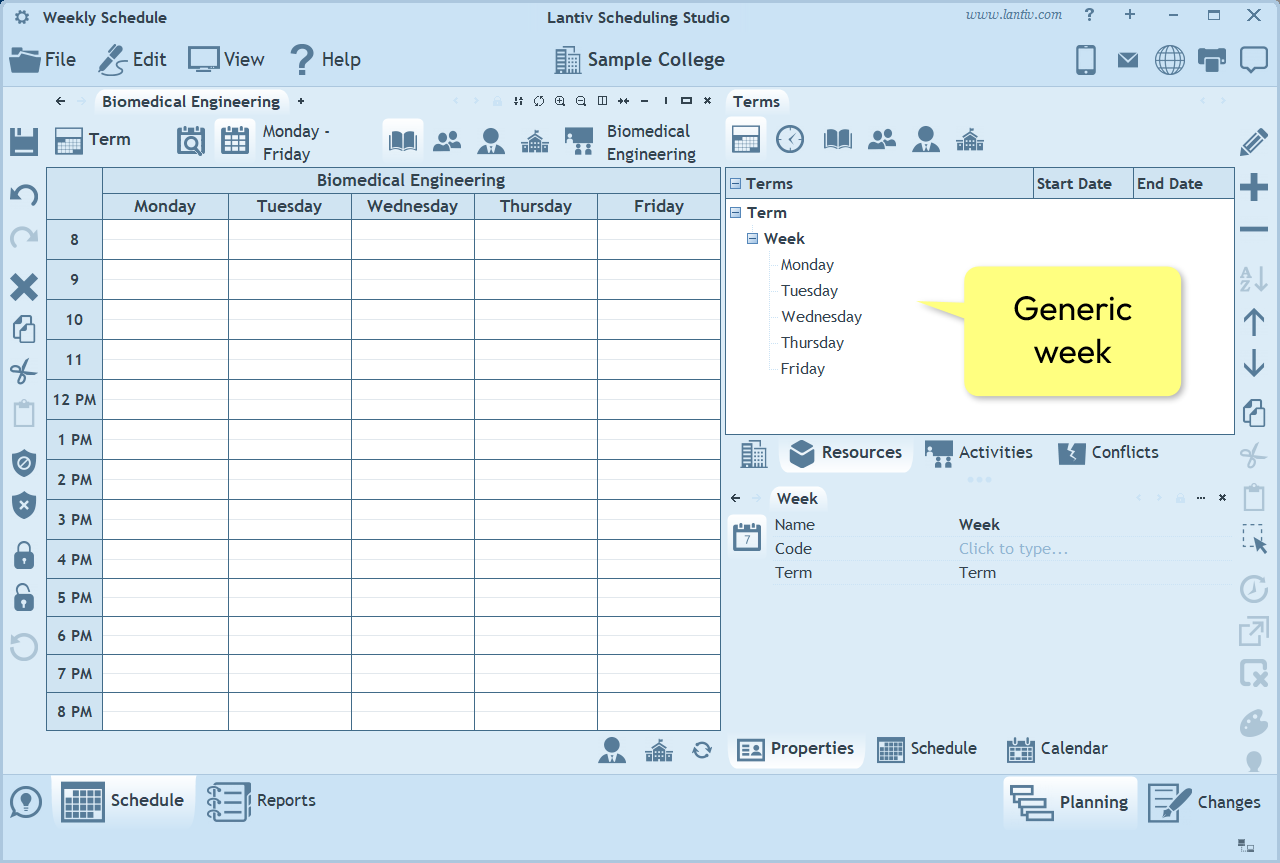
Most commonly, generic days are used to create a weekly recurring schedule. If this is the type of schedule you are building, enter the days of the week as follows.
Two-Week Schedule
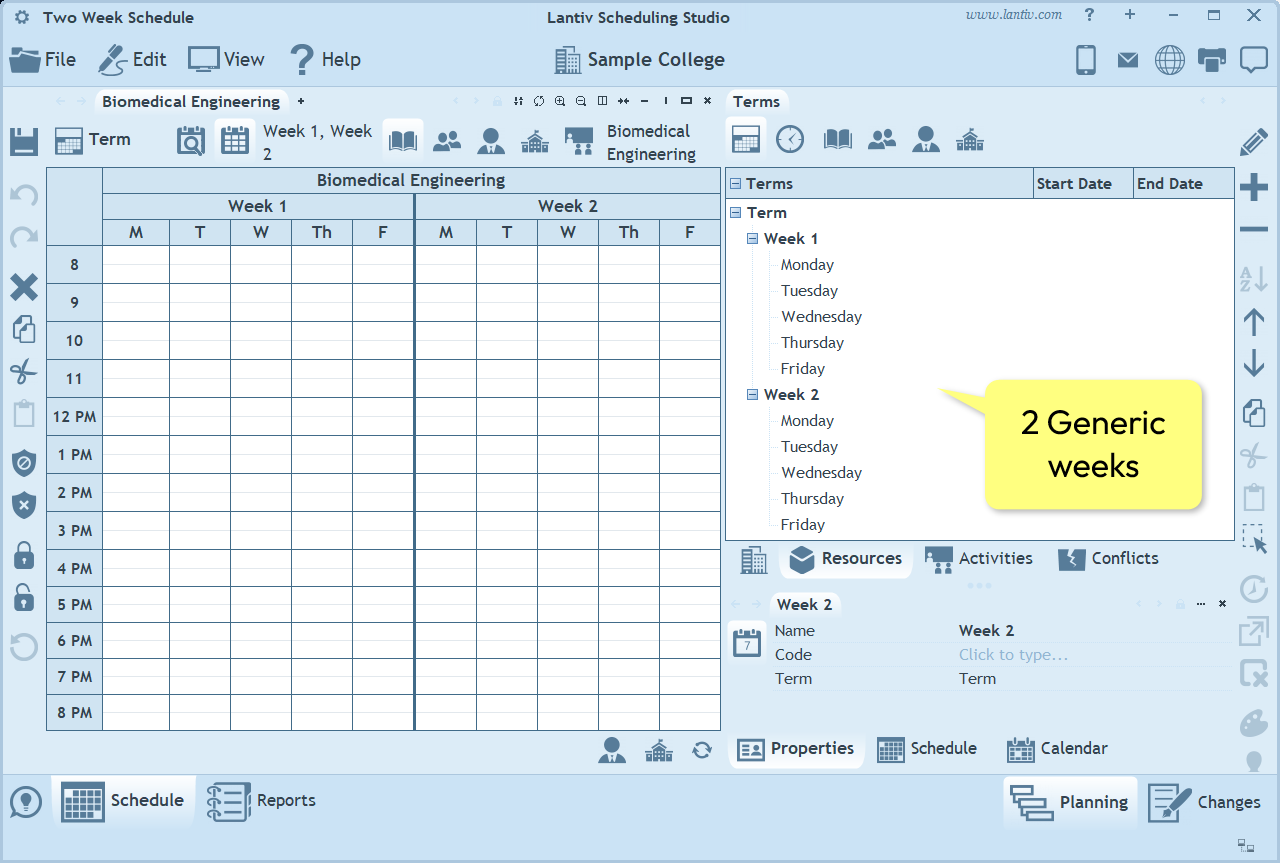
For a bi-weekly recurring schedule, the generic days can be divided into two weeks, for example Week 1 and Week 2. When the program detects more than one week, it automatically displays the week name in the schedule above the corresponding days.
Time Scales and Periods
The second page in the Resources pane is the Time Scales and Periods page.
A Time Scale defines the layout of the schedule's time axis. There are three types of time scales.
- Clock time scale – Displays exact hours and minutes, such as 8:00, 8:30, 9:00, etc.
- Period time scale – Displays named or numbered periods, such as Period 1, Period 2, Lunch, etc.
- Combined time scale – Displays both hours and periods side by side in separate columns.
Note: The time scale layout only affects how the time axis is displayed. Activities can be scheduled at any start and end time, regardless of the selected layout. For example, whether using a clock or period layout, an activity can still be scheduled from 8:13 to 9:27.
Let's take a look at the different time scale layouts and how they are set up.
Scenario 1: Clock Time Scale
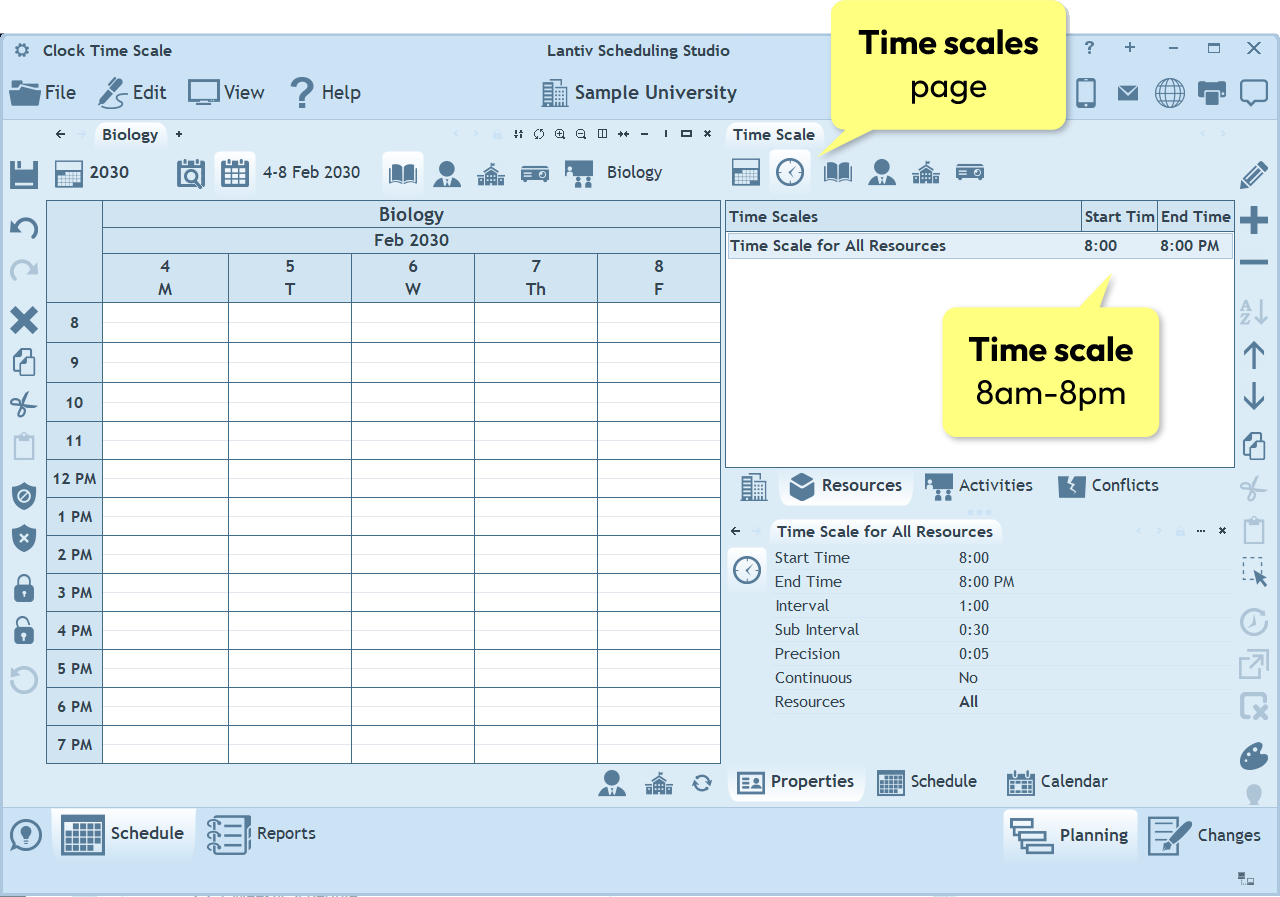
If you want the schedule's time axis to display hours and minutes, you do not need to enter anything on this page. The program creates a default clock time scale automatically. Simply set its start and end times in the time scale's properties. By default, the time scale runs from 8:00 AM to 8:00 PM.
Time Scale Appearance
You can control whether the intervals on the left side of the time scale are displayed in 1-hour increments, or at shorter or longer intervals. This is determined by the Interval property of the time scale (see the Properties pane).
The Sub Interval property adds additional horizontal gray lines that divide each interval into two or more parts, depending on the sub-interval length.
These two properties affect only the visual appearance of the time scale. They do not affect the times at which activities can be scheduled.
The Precision property determines the minimum resolution of the time axis, used mainly when dragging and dropping activities. The default value is 5 minutes, which means that an activity can be dropped at 8:00 or 8:05, but not at 8:03. If you set the precision to 1 minute, activities can be dragged and dropped at any hour and minute.
Scenario 2: Period Time Scale
If you want the schedule's time axis to display named or numbered periods, you need to list them on this page.
One list of periods
The most basic configuration is to define one list of periods for all resources and all days. To do this, click the plus button on the right-side toolbar and select "Period" or "Periods (5)" (which adds five periods at a time). Repeat this until the list contains the desired number of periods.
To rename a period, select it and enter its name in the Properties pane below.
You should also set the start and end times of each period. These are entered in the Properties pane after selecting the period. Make sure that the periods do not overlap and that each period's start time is not earlier than the end time of the previous period.
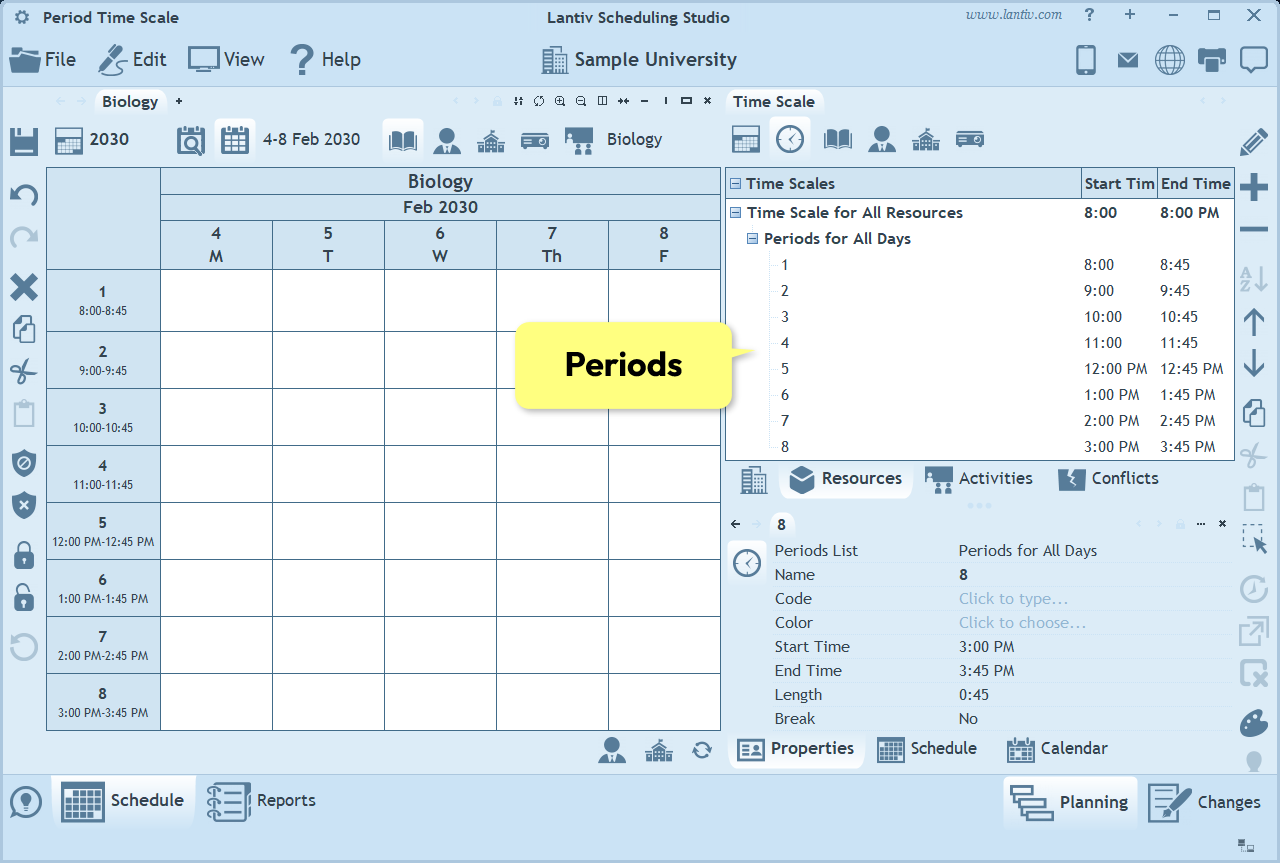
Note: When entering afternoon or evening times in 12-hour format, append p or pm, for example, "4:00pm". Otherwise, the program will interpret the time as occurring before midday.
Different periods on different days
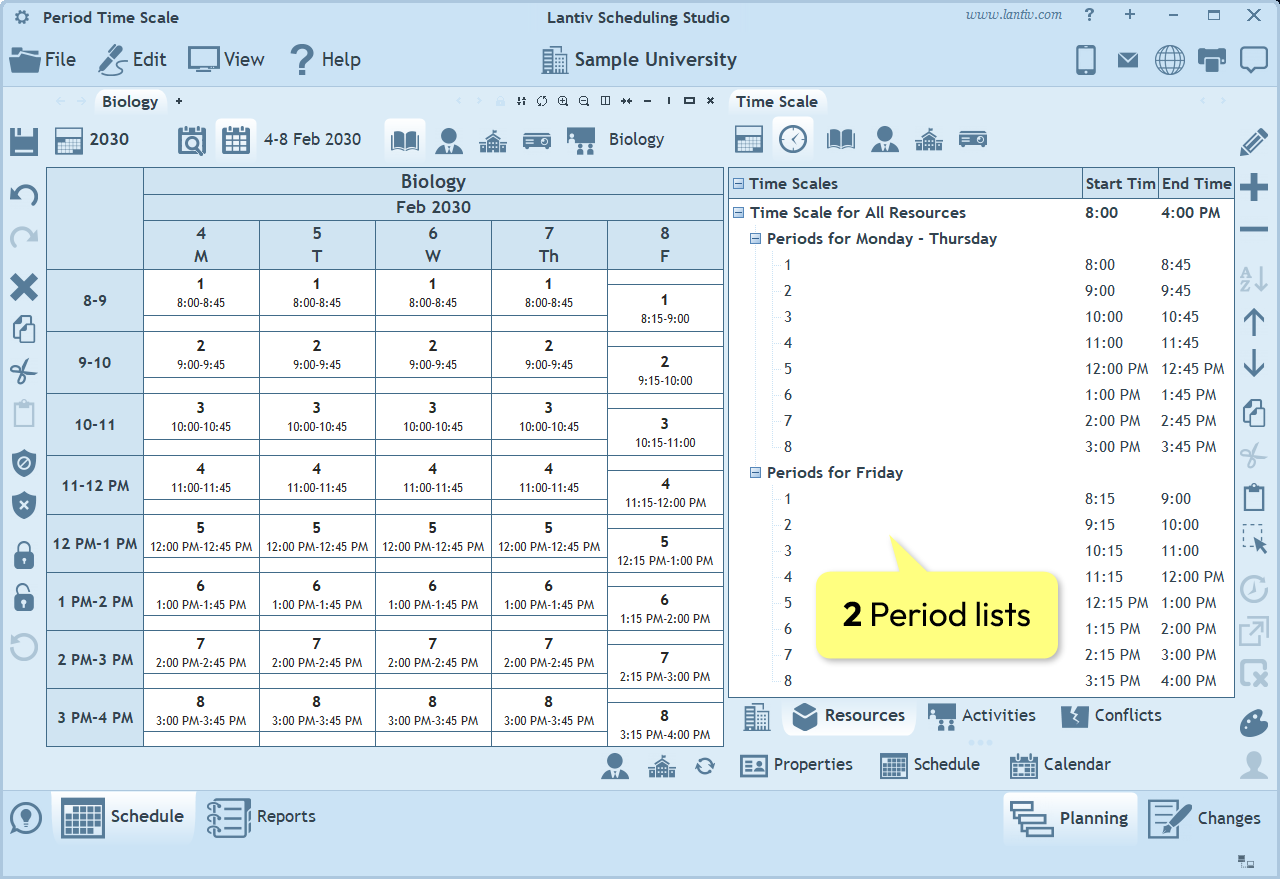
The program also supports schedules where different days have different sets of periods. For example, the periods on Monday–Thursday may differ from those on Friday.
To set this up, either add another Periods List using the plus button, or copy and paste the existing one. Once you have two period lists, assign Monday–Thursday to the first list and Friday to the second. It will look like this:
Different periods for different resources
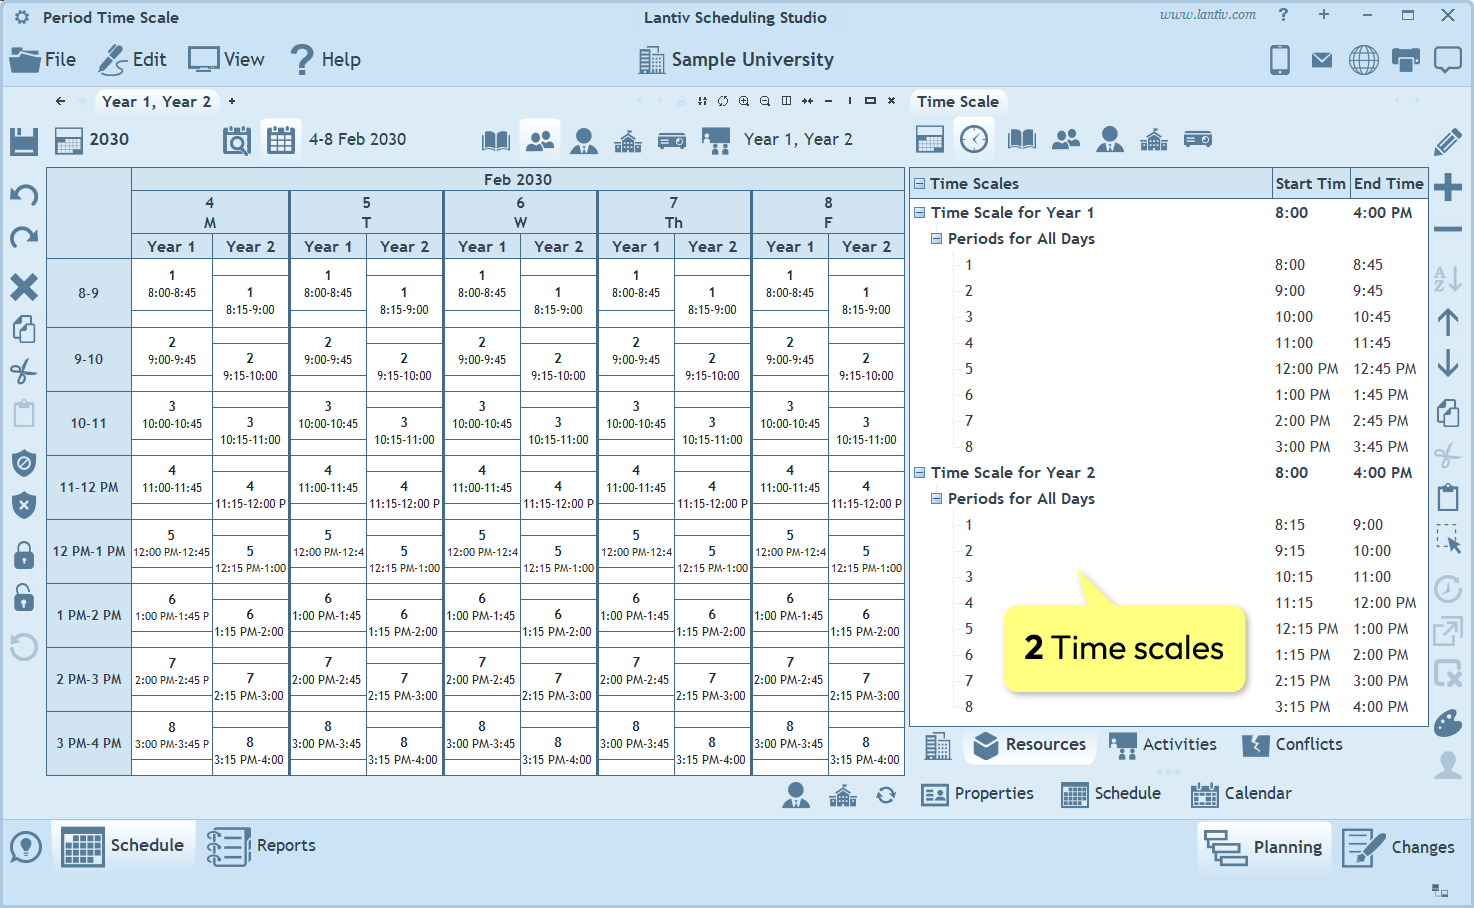
Different resources can also have different sets of periods. For example, one group of students can have a different set of periods from another group.
To set this up, add a new time scale to the list. The new time scale can be assigned to specific groups by first changing its All Resources? property to No, and then selecting the desired groups in the Groups property. Once the new time scale has been added, you can define its periods using the plus button.
When an individual group's schedule is displayed, it will use that group's own set of periods. When multiple groups with different period lists are displayed together, the program uses a common time axis and displays the periods within the schedule of each group.
Courses
The third page in the Resources pane is the Courses page.
A course provides information about what people are studying or doing when they participate in an activity. For example, a course could be Chemistry, Introduction to Psychology, Lunch and many others. A course is not a physical resource, so it does not cause conflicts due to double booking. Each activity can be assigned one or more courses.
Courses can be organized in a hierarchy of top-level courses, sub-courses, sub-sub-courses (and so on). A course can be a sub-course of several parent courses. The schedule of a parent course includes all the activities of its sub-courses. For example, if Human Anatomy and Life Sciences are sub-courses of Biology, viewing the schedule of Biology will display all the activities of both sub-courses.
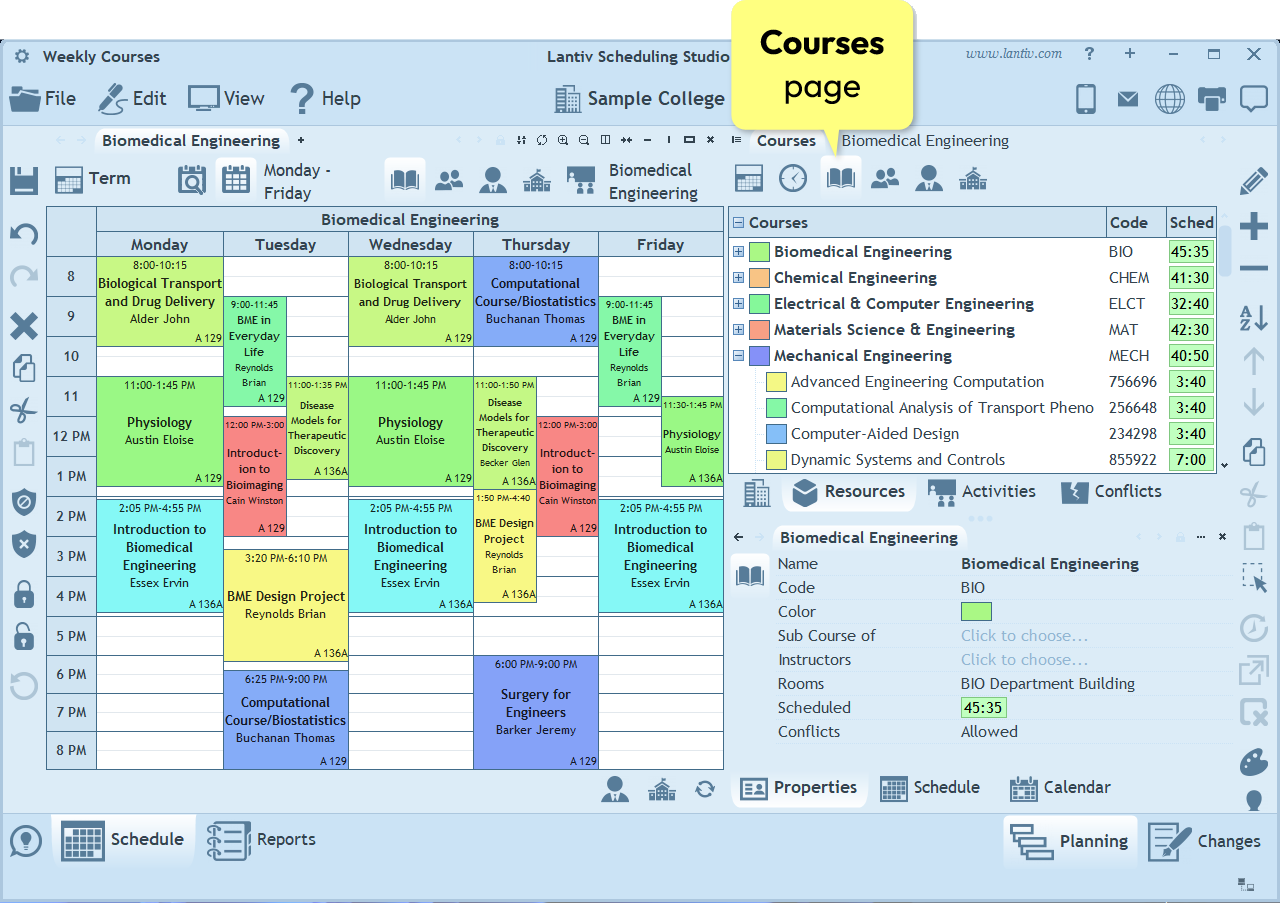
The course assigned to an activity appears in every cell where that activity is scheduled. Like all resources, a course can be assigned a color. By default, the background color of a scheduled cell matches the color assigned to the course in that cell.
How to create sub-courses?
To make one course a sub-course of another, first add both courses to the list. Then select the course that you want to become the sub-course, and in its properties choose the parent course in the Sub Course of field.
For example, to make Human Anatomy a sub-course of Biology, select Human Anatomy and set its "Sub Course of" property to Biology.
Groups and Programs
The fourth page in the Resources pane is the Groups page.
A group is a collection of people who participate in multiple activities together. Groups can contain an explicit list of students, or they can be symbolic, representing an enrollment option, a yearly program, a field of study or any other logical grouping of participants.
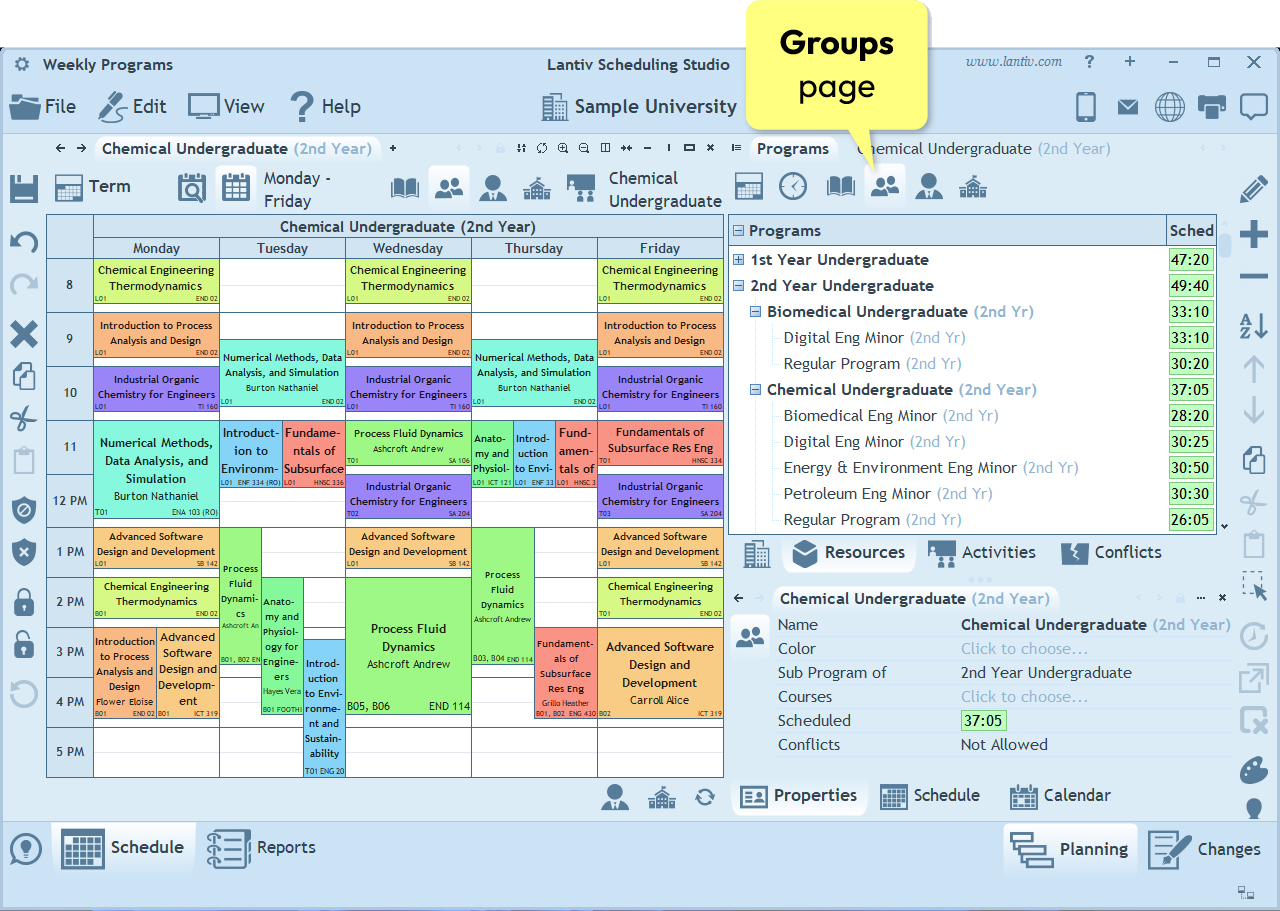
Just like courses can have sub-courses, groups can have sub-groups. Here are some important facts about sub-groups:
- A group can be both a sub-group and a parent group.
- A group can be a sub-group of multiple parent groups. In such cases, it appears beneath each of its parent groups in the list.
- All activities scheduled for a sub-group also appear in the schedules of all its parent groups, as well as their parent groups, and so on.
- Two sub-groups of the same parent group are not considered to be in conflict unless there is at least one student who is explicitly enrolled in both of them.
Students
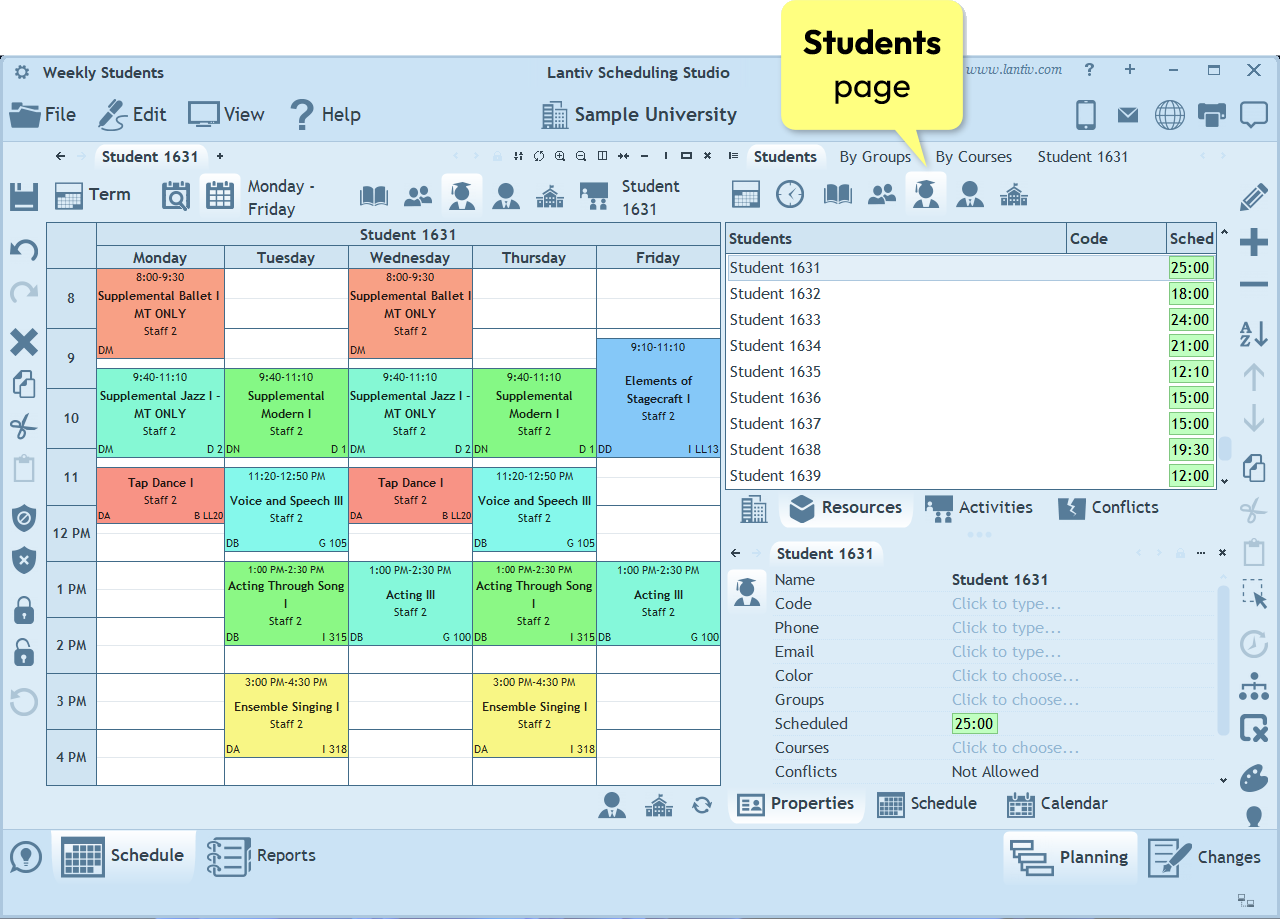
The fifth page in the Resources pane is the Students page. A student is a human individual who participates in a group or an activity.
Students need to be entered only if personal student timetables are required. If you only need timetables for courses or groups, there is no need to enter students at all.
An individual student’s timetable includes all activities in which the student participates, either directly by being enrolled in the activity, or indirectly by being enrolled in a group that is assigned to the activity. Like all human resources, scheduling a student in two different activities at the same time results in a double-booking conflict.
Instructors
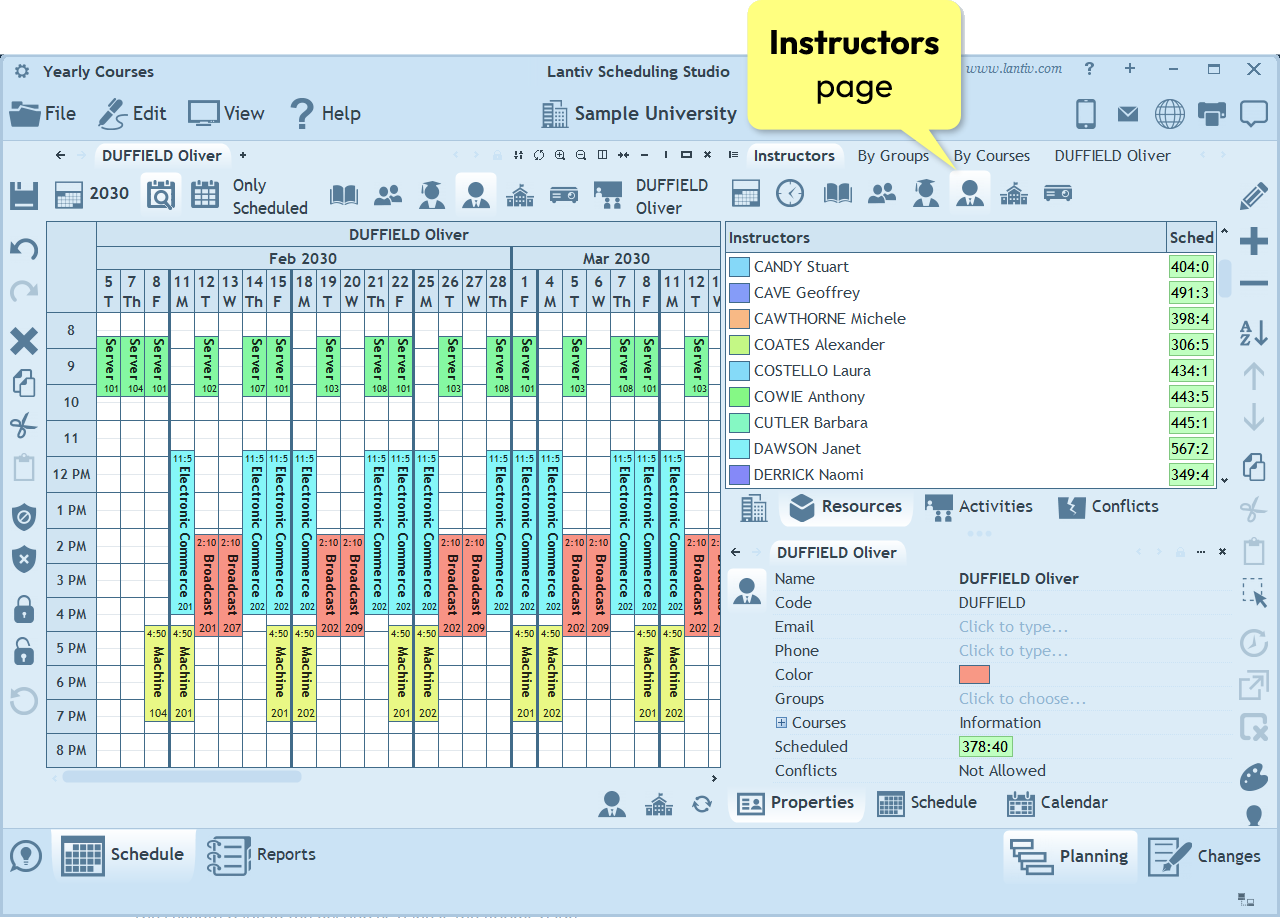
The sixth page in the Resources pane is the Instructors page.
An Instructor is a human individual who teaches or supervises an activity.
An instructor's schedule consists of all the activities in which they take part. Scheduling an instructor in two overlapping activities is considered a double-booking conflict by the program.
Rooms, Buildings and Campuses
The seventh page in the Resources pane is the Rooms page.
A room, or more generally, a location, is the place where activities take place. A location can contain other locations and can itself be contained within a larger location.
Locations can be organized in a hierarchy. Defining parent locations makes it possible to display a combined schedule of all their sub-locations (for example, all the activities taking place in a particular building). It is even possible to define campuses as the parent locations of buildings. If this functionality is not needed, all rooms can simply be defined in a single list without using a hierarchical structure.
How to enter travel times between locations?
The program allows you to define travel times between locations. A travel time is the amount of time required to travel from one location to another. These travel times are taken into account whenever activities are scheduled.
If a person is scheduled in two activities that take place in different locations, the program verifies that the time between the end of the first activity and the start of the second (that is, the gap between them) is at least as long as the specified travel time between those locations. If the gap is shorter than the required travel time, the program reports a distance conflict.
For example, you can define that the walking time between two buildings is 10 minutes. The program will then warn you if you try to schedule someone in two activities that would require them to travel from a room in the first building to a room in the second building in less than 10 minutes.
Every room or building has a property named Distances. This property defines the travel time (in minutes) from that location to other locations. To enter travel times, first click the Distances property in the Properties pane. In the popup list, click next to the room or building for which you want to specify a travel time, and then enter the duration in the format hours:minutes.
Equipment
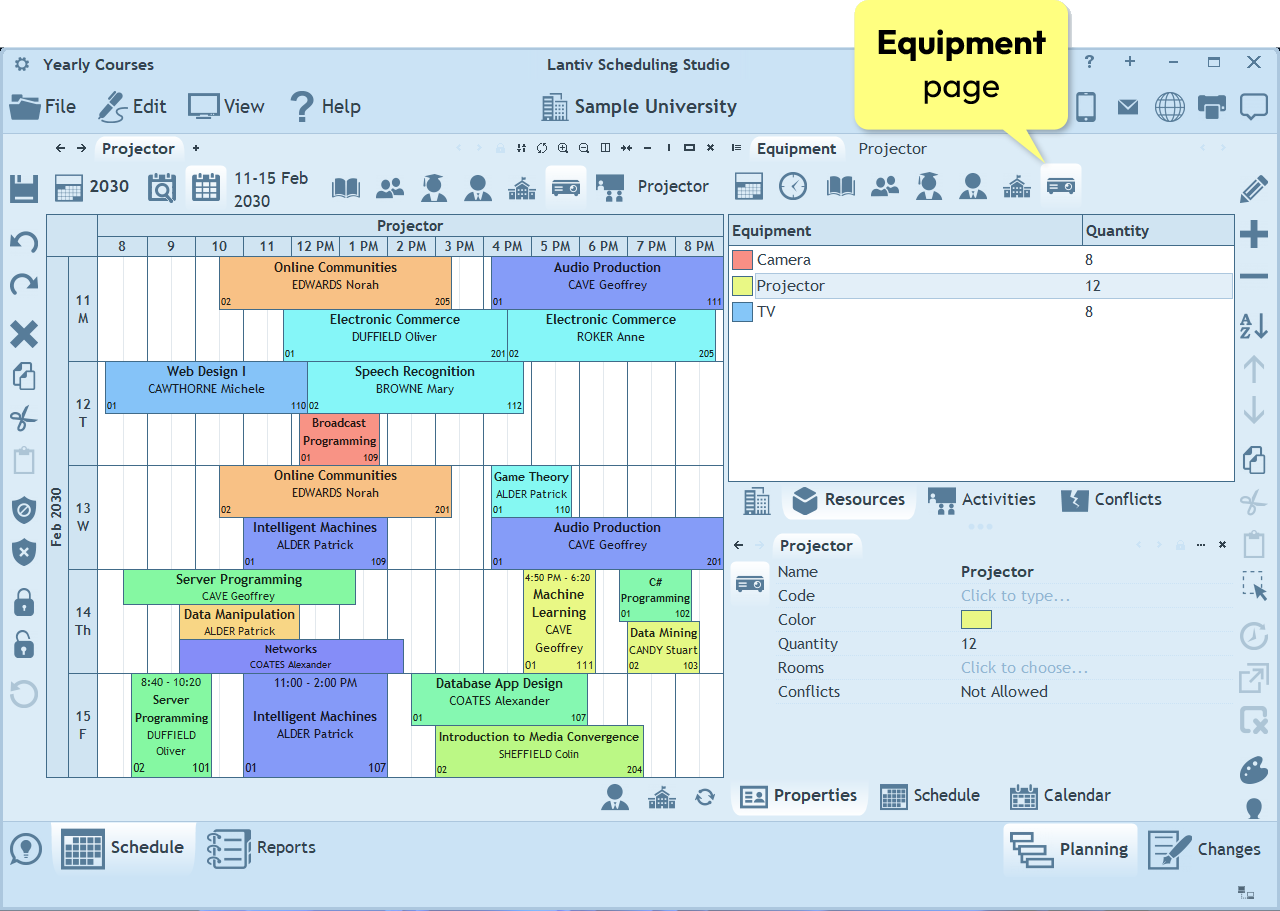
The last page in the Resources pane is the Equipment page.
Equipment consists of movable physical items that may be required for an activity, such as a TV, projector, microscope, and so on.
Equipment is the only type of resource that is quantified. An equipment item's quantity represents the number of identical items available in stock. The program assumes that all items of the same equipment type are interchangeable.
The program allows multiple overlapping activities to use the same type of equipment, provided that the total number of items required does not exceed the available quantity. If more overlapping activities require the equipment than there are items in stock, the program reports a conflict indicating that there are not enough items available to accommodate all of them.
Entering Resources
In this section, we describe how to add and remove resources, edit their properties individually or in bulk, and make the resource entry process quick and efficient.
How to add resources?
To add resources, click the plus button on the right-hand toolbar. This opens a menu where you can choose the type of resource to add. For example, to add a course in the Courses page, select Course in the menu. The menu also includes options for adding multiple resources in a single operation, such as adding five courses at once. After the resources are added, they appear in the list, where you can select them to edit their properties.
How to duplicate resources?
Another way to add resources is by using copy and paste. You can select an existing resource in the list—or multiple resources by clicking the first one and then Shift+clicking the last—press Ctrl+C to copy, and then Ctrl+V to paste. This duplicates the selected resources and adds the new copies to the list.
How to remove resources?
To remove resources, select them and then click the minus button on the right-hand toolbar. The selected resources will be removed from the list.
Note: Any operation in the program can be undone by clicking the Undo button on the left-hand toolbar or by pressing Ctrl+Z on the keyboard. If you remove something by mistake, simply press Ctrl+Z to undo the action.
How to edit resource properties?
When you select a resource, its properties are displayed below the list in the Properties pane. To edit a property, click it and then enter a new value using the keyboard, or choose one from a pop-up list.
How to edit the properties of multiple resources?
When you need to assign the same property value to multiple resources (for example, selecting the same parent course for 20 courses), you don’t need to edit each resource individually. Instead, select all the relevant resources and edit the property in the Properties pane. The change is applied to all selected resources in a single operation.
To select multiple resources, you can use one of the following three methods:
- Ctrl + click: Hold down the Ctrl key and click the items you want to select. Each click adds an item to the selection; clicking a selected item again removes it from the selection.
- Shift + click: This method is useful for selecting a continuous range of items. Click the first item, scroll to the last item, then hold down the Shift key and click the last item. All items between the first and last are selected.
- Click and drag: Click an item and, without releasing the mouse button, drag the mouse over additional items. Each item you pass over is added to the selection. Release the mouse button when you reach the last item.
Note: The steps described above apply only when Editing Mode is turned off. When Editing Mode is enabled, clicking an item starts editing it rather than selecting it. In this case, first turn off Editing Mode by clicking the pencil button, and then select multiple resources.
How to quickly edit names using only the keyboard?
To speed up data entry, the program allows you to edit resource names directly using the keyboard, without using the Properties pane. This Editing Mode is enabled by clicking the pencil button in the top-right corner of the screen.
In Editing Mode, clicking a resource name in the list allows you to edit it immediately. You can complete the entire editing process using the keyboard only: after editing a value, press the Down Arrow key to move to the next or previous resource. If multiple columns are available, use the Tab key to move to the next column. When you finish editing, press Enter.
How to assign colors automatically?
Instead of assigning a color to each resource manually, the program allows you to assign colors to all selected resources at once. To do this, click the paintbrush button on the right-hand toolbar. A pop-up menu opens with four options:
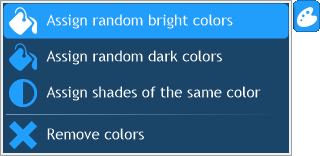
- Assign random bright colors - Automatically assigns bright colors to all selected resources.
- Assign random dark colors - Automatically assigns dark colors to all selected resources.
- Assign shades of the same color - Lets you choose a base color (bright or dark) and then assigns different shades of that color to all selected resources.
- Remove colors - Removes color assignments from all selected resources.
Note: If only one resource is selected, colors are applied to all resources in the list.
If you don’t like the randomly assigned colors, you can apply them again—different random colors are generated each time. You can also manually change the color of any resource by selecting it and choosing a different color in the Properties pane.
The next chapter: Activities.