Getting Started
The best way to learn the program is to follow this user’s guide and practice using the sample files included with the program. Let’s get started!
If this is your first time using the program, the basic steps are simple. First, the application starts. Next, you either open an existing file or create a new one. Once the scheduling workspace opens, you can begin entering resources and start scheduling.
Contents
Initial Setup
First, let’s start with two basics: language and appearance. If this is your first time opening the program and you don’t like the dark blue theme, you can change it using the steps below.
How to configure the language of the program?
When the program is launched, it allows you to select the language of the user's interface. The language can be selected in one of two places: at the bottom right corner of the splash screen or in the settings menu at the top left corner of the main window.
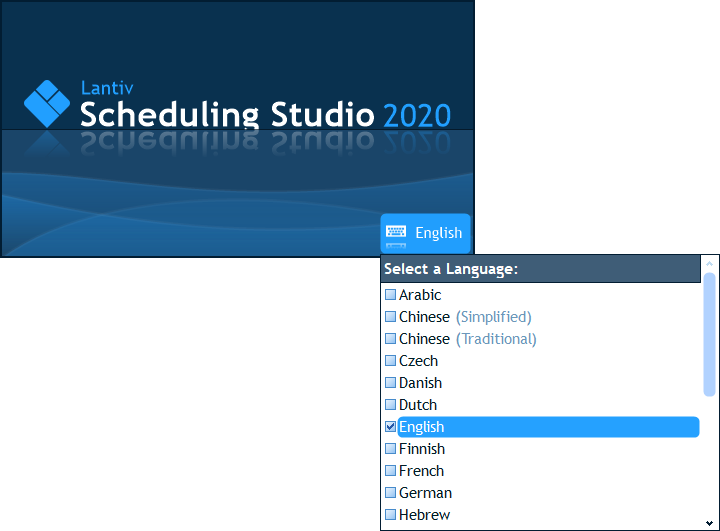
If you change the language on the splash screen, the change takes effect immediately. If you change the language from the Settings menu, you will need to close and restart the program for the change to apply.
How to configure the style and color of the user interface?
In addition to choosing a language, the Settings menu in the top-left corner of the main window also lets you choose an icon style and a color theme:
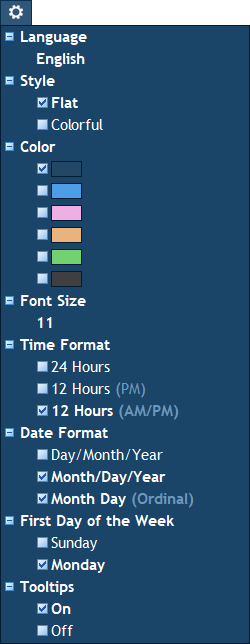
The icon style controls the type of icons used throughout the program—either colorful or monotone. The color sets the overall look of the user interface and its visual elements. Several color options are available, with dark blue as the default. If you choose a different style or color, you will need to close and re-launch the program for the change to take effect.
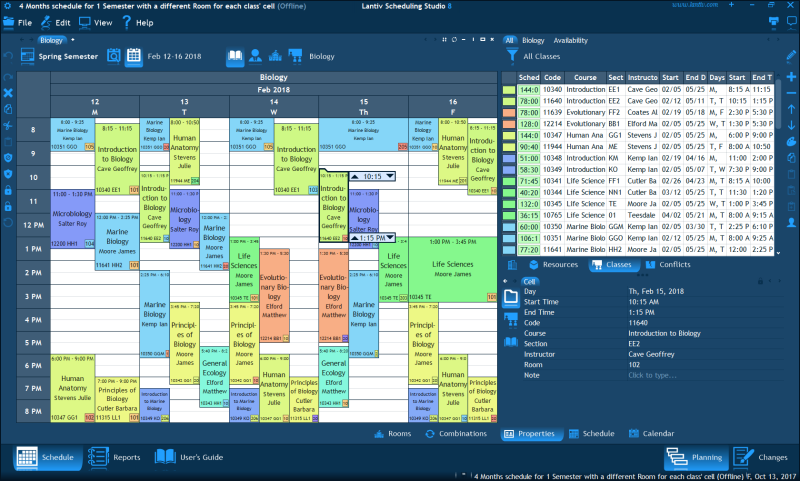
Below is how the program appears with the default dark blue color theme and the monotone icon style:
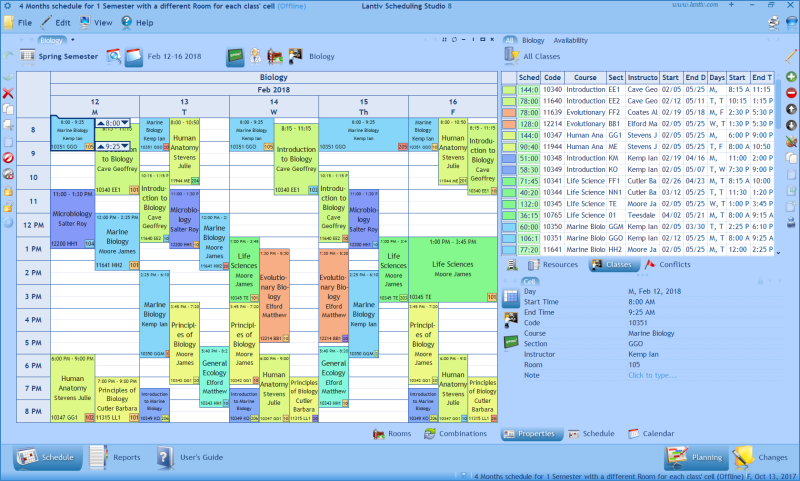
And here is an example of how the program looks with the bright blue color theme and the colorful icon style:
Sample Files
To help you get familiar with the program more quickly, we've provided several sample files for different types of educational institutions. Each sample file includes a pre-defined database and schedule. You can use these files to explore the program's features, experiment freely, and get a feel for how the software works.
The software is very generic and supports many scheduling scenarios. We have tried to cover the most common scenarios in the sample files, but it is possible that your institution type is not included, or that your schedule looks different from the sample ones. This is not a cause for concern. The program is highly customizable, and we still recommend using one of the sample files as a starting point.
How to open a sample file?
You can find the sample files in the bottom-left corner of the main window:
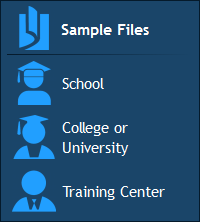
To open a sample file, simply click on it.
Note: When working offline with a sample file, you cannot save any changes. You are free to explore and experiment with all of the program’s features—this is exactly what the sample files are for. Changes can only be saved when you are working online, which requires a server subscription.
Workspace
Once you open a file, you will see the workspace. The workspace is divided into two parts—left and right—each containing dedicated panes. Almost everything you do in the software takes place within one of these panes.
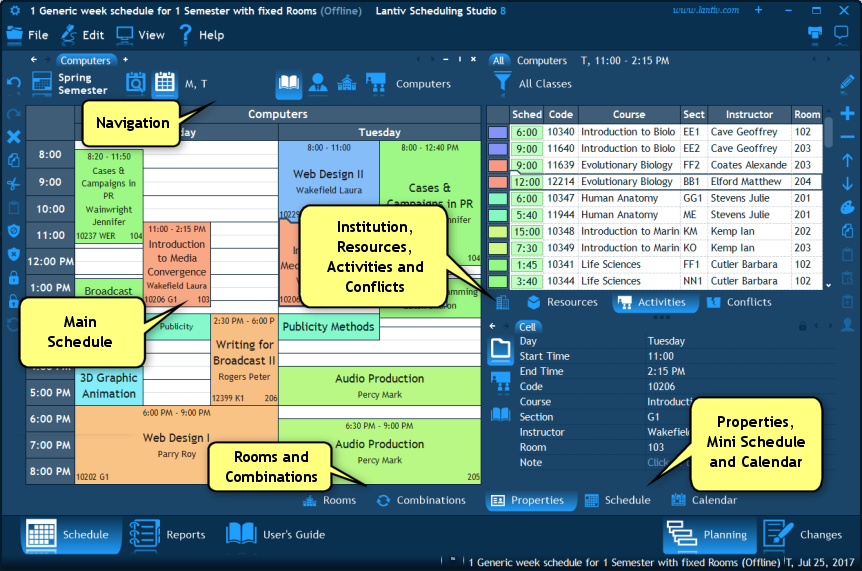
The panes that you see are:
Left Side
- Navigation - This pane lets you choose which days and whose schedule are currently displayed on the screen.
- Main Schedule - This pane shows the main view of all schedules.
Right Side
- Institution - This pane is where you enter the institution's details, vocabulary, and properties.
- Resources - This pane is where all resources are entered, including days, time scales/periods, courses, groups, students, instructors, rooms, and equipment.
- Activities - This pane is used to enter activities (classes/sections) and schedule them using drag and drop.
- Conflicts - This pane displays any existing conflicts in the schedule.
- Changes - This pane displays the changes made to the schedule (only in the Changes mode).
- Properties pane - This pane displays the properties of the currently selected object (resource, activity, or cell) and allows you to edit them.
- Mini Schedule pane - This pane displays the schedules of the resources involved in the currently selected cell.
Bottom
In the bottom-left corner, you’ll find the following tabs:
- Schedule - This tab displays the workspace shown above.
- Reports - This tab displays various reports that you can print or export.
In the bottom-right corner, you’ll find the following buttons for switching the scheduling mode:
- Planning - This mode is used to plan the schedule for the upcoming term.
- Changes - This is a special scheduling mode used to record day-to-day changes such as sick leave, substitutions, or unplanned events.
Think of the schedule on the screen as a grid or chart. One direction shows the times (e.g. 8:00, 9:00, 10:00). The other direction shows the days of the week or the calendar (such as Monday, Tuesday, Wednesday) along with the selected resources. Where a day, time, and a resource meet, you see a single cell. Each cell represents what is scheduled for that resource at that exact time. In the Navigation pane, you choose which days and resources are shown.

How to select a term?
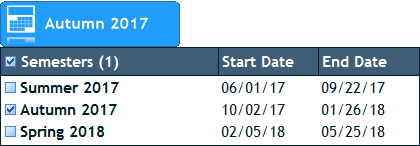
The first selector in the Navigation pane is the term selector. A term (or semester) is simply a range of dates defined by a start date and an end date—for example, a Fall Term from September 1 to December 31.
In many cases, a file contains only one term. However, if you need to prepare schedules in advance for multiple terms, the program lets you define all required terms in the Resources pane (as explained later) and select which one or ones you are currently working with using this selector in the Navigation pane.
How to select days?
After the semester selector, there is a drop-down selector used to choose days. You can select generic days such as Monday, Tuesday, Wednesday, or specific calendar dates, such as September 1-7. This drop-down selector includes both options. If you have defined generic days in the Resources pane, clicking the selector displays those days. Otherwise, a calendar is shown, allowing you to select dates.
Selecting generic days or weeks
To select a single generic day or week, click directly on its name (not on the checkbox). To select multiple days or weeks, use the checkboxes to the left of their names. Then, when you are done, click anywhere outside the pop-up list to close it. To select or deselect all days in the list, use the checkbox at the top of the pop-up list.
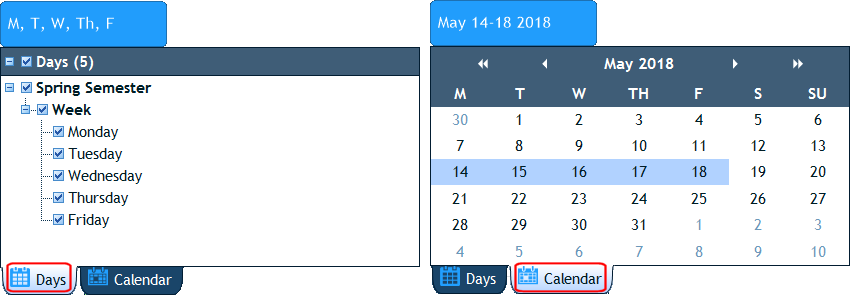
Selecting calendar dates
To select a single date in the calendar, click on the date. To select a single week, click on the week number. To select a full month, click on the month name. To select the entire term, click on the term name at the top. Finally, click outside the calendar to close it.

To select a range of consecutive dates, click the first date and then drag the mouse (without releasing the mouse button) to the last date. Release the mouse button to complete the selection. To select multiple non-consecutive dates, hold down the Ctrl key on the keyboard and click each date you want to select. The pop-up calendar will remain open so you can continue selecting dates. When you are finished, click anywhere outside the pop-up calendar to close it.
To move backward or forward through months and years, use the arrow buttons at the top of the calendar.
You can also use the mouse wheel to scroll through days or weeks without opening the pop-up list. Simply place the mouse cursor over the day selector in the navigation pane and scroll the mouse wheel up or down. If a single day or date is selected, scrolling the mouse wheel moves the selection one day forward or backward. If a week is selected, scrolling moves the selection to the next or previous week.
Displaying only scheduled days
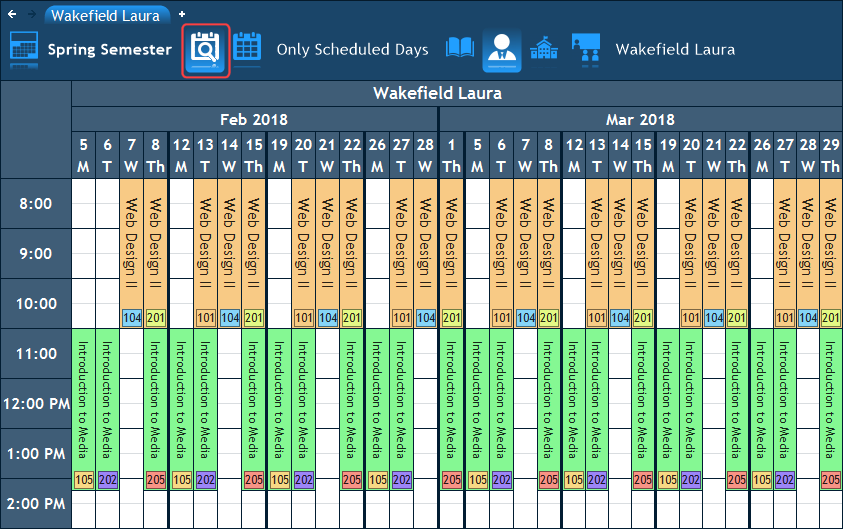
Before the day/date selector, there is one more button we haven’t covered yet: the Only Scheduled Days button. When you click this button, the program automatically determines which days or dates a resource is actually scheduled and displays only those days. For example, if an instructor is scheduled over a two-month period but only on Mondays, Tuesdays, Wednesdays, and Thursdays, the program will display only those days.
How to select a resource type?
Resources are the "things" that take part in an activity, such as instructors, students, rooms, or courses. When an activity is scheduled, it automatically appears in the schedules of all the resources involved in that activity.
In the navigation pane, there are seven buttons that let you choose which type of resource you want to view. Each button shows the schedule for a different type of resource. From left to right, the resource types are: course, group, student, instructor, room, equipment, and activity (section/course offering). For example, when you click the Instructor button, you can see the individual schedules of instructors.

You can select only one of these buttons at a time. When you click a button, any previously selected button is automatically turned off. This is because each table can show only one kind of resource at a time. For example, a table can show either instructor schedules or student schedules, but not both together. If you want to view different kinds of schedules at the same time, you can split the screen into multiple tables. Each table can then display a different type of resource.
How to select resources?
The last selector in the navigation pane is used to choose the specific resources whose schedules you want to view. When you click this selector, a pop-up list opens showing all available resources of the currently selected type (activities are an exception—they are selected in the Activities pane, not from this list). In the pop-up list, you can select either one resource (by clicking on its name) or multiple resources (by clicking the checkboxes next to their names).
Tip: You can also use the mouse wheel to scroll through the resources. Simply place the mouse cursor over the resource selector button (without clicking it), and then scroll the mouse wheel up or down to move through the list.
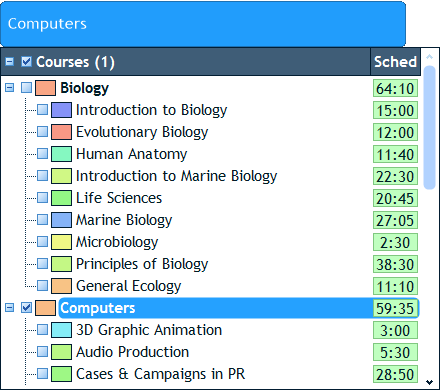
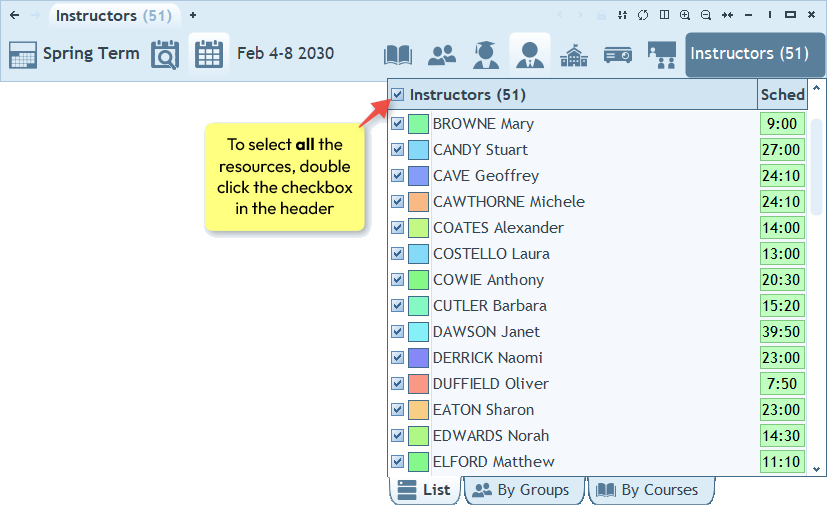
How to select all resources?
To select all resources, double-click the checkbox at the top of the pop-up list (next to “Courses” in the screenshot above). The first click clears the current selection, and the second click selects all visible items in the list.
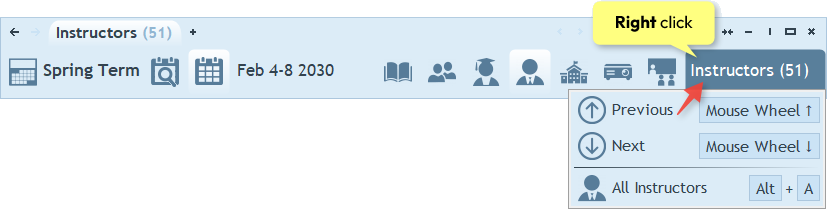
Tip: You can also right-click the resource selector and choose All Courses, All Instructors, and so on in the popup menu. Alternatively, you can use the Alt + A keyboard shortcut.
Main Schedule
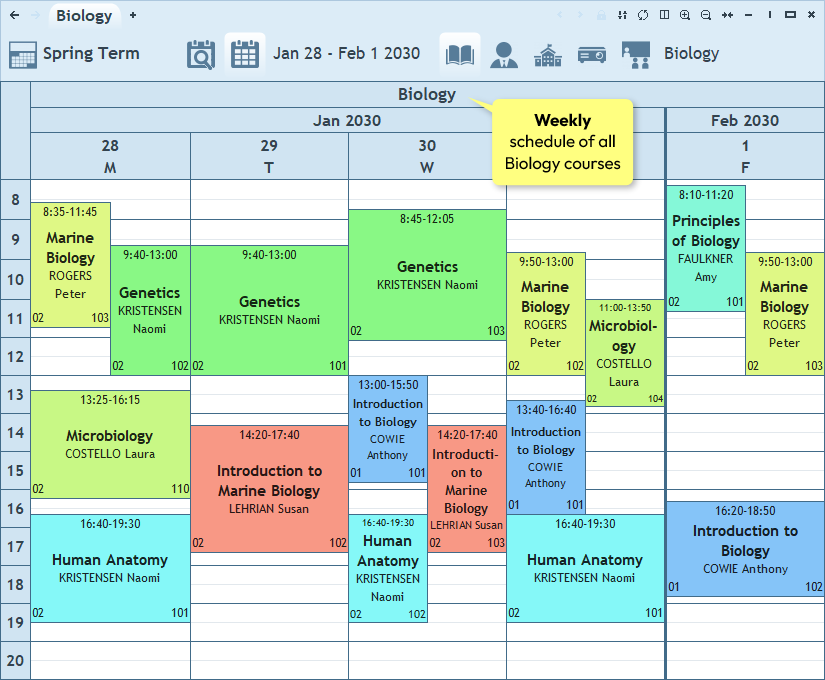
The main schedule pane appears in the center of the screen and shows the schedule grid with all its cells. Here is an example of a weekly schedule of all Biology courses:
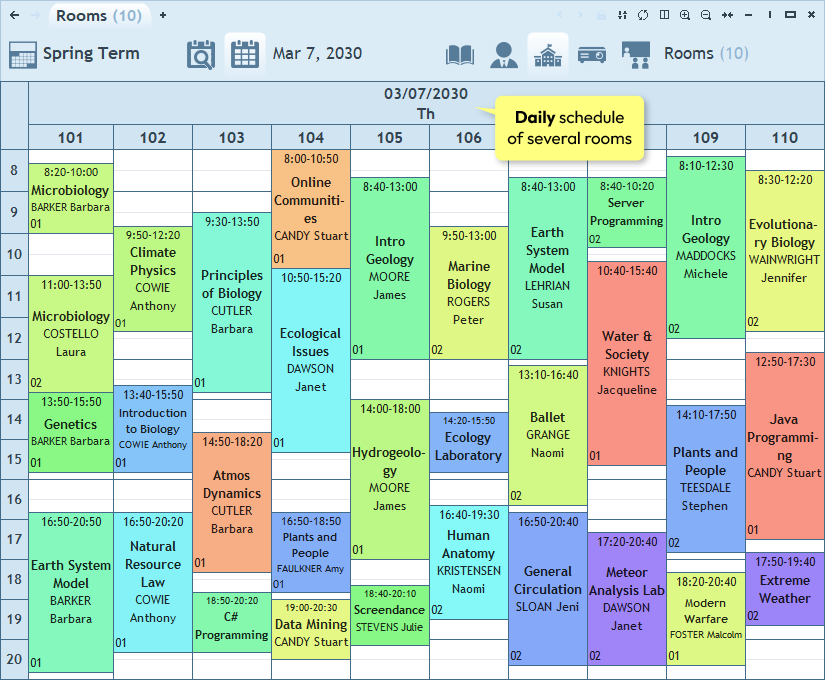
Here is another example of a daily schedule of several rooms:
Here is another example of a weekly schedule for instructors. In this schedule, instructors are shown along the vertical axis, while days and times are shown along the horizontal axis. This layout is created by clicking the Swap Axes button in the top-right corner of the navigation pane:
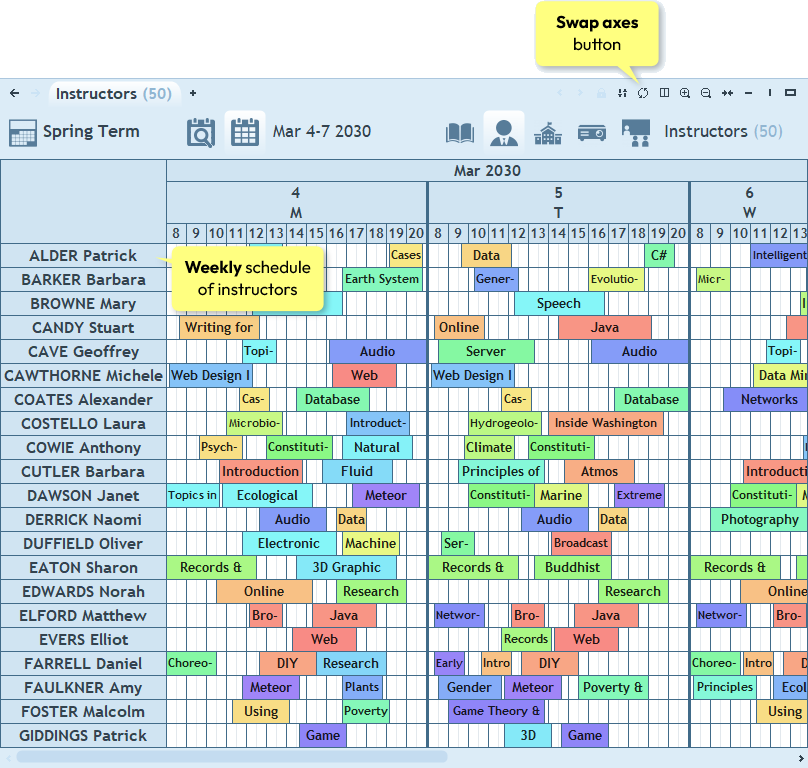
Note: When multiple days and resources are displayed, there are four possible layout options. Each time you click the Swap Axes button, the view switches to the next layout.
How to make rows and columns larger?
The program automatically tries to fit the entire schedule into a single window. If the view feels too crowded or the cells are too small, you can increase their size. To do this, place the mouse cursor over the schedule and press the middle mouse button (the mouse wheel). While holding it down, drag the mouse:
- Drag to the right to make the columns wider
- Drag down to make the rows taller
Note that you can’t enlarge just one row or column. All rows or all columns are resized together and stay proportional. This is because the program must keep an accurate and consistent time scale.
How to select a cell?
To select a cell, simply click on it.
When you select a cell, a small tab appears in its top-left corner. This is the Drag & Drop tab. You can use it to move the cell by dragging it with the left mouse button, or to duplicate the cell by dragging it with the right mouse button.
The selected cell also shows two time markers in its top-right and bottom-right corners. These indicate the cell’s start time and end time.

You can use the time markers to fine-tune your selection. For example, if a cell spans 1 hour and you want to select only 45 minutes, drag one of the time markers: click on the time marker and drag it up or down to select just part of the cell.
Properties Pane
The Properties pane is located in the bottom-right corner of the workspace. It shows the details of the item you most recently clicked and lets you edit them:
- If you click a cell in the schedule, the Properties pane displays information such as the day, time, scheduled activity, and assigned resources.
- If you click a resource in the Resources pane, the Properties pane displays the resource’s properties, including its name, code, assigned color, and other attributes.
- If you click an activity in the Activities pane, the Properties pane displays all the resources that participate in that activity and allows you to modify them.
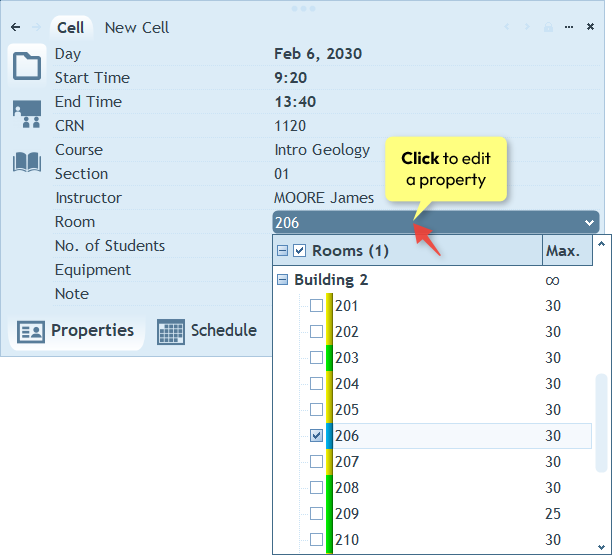
To edit a property, click it and then either enter a value using the keyboard or select a value from a pop-up list.
Note: When you select multiple items (for example, several resources or activities), you can edit their properties in bulk. For example, if you select several activities and then choose a value for the Instructor property, the selected instructor will be assigned to all of those activities.
The next chapter: Institution.