
Conflicts
A conflict arises whenever the schedule does not satisfy a realistic requirement. For example, if the same person is scheduled to be in two different locations at the same time, the program reports a conflict because that person cannot physically be in two places simultaneously.
In this chapter, we describe the various types of conflicts that the program monitors and explain what happens when they are detected.
Types of Conflicts
The program monitors a variety of potential conflicts and warns you whenever one is detected. If a conflict occurs as a result of your most recent action, a Conflicts Warning Window will appear, showing the new conflicts and asking whether you want to cancel the operation or ignore the warnings and continue anyway. If you choose to continue, the conflicts will be logged in the Conflicts pane — which we will discuss later in this chapter.
First, let us review the different types of conflict scenarios that the program can detect and warn you about.
Double-booked person or group
Naturally, people cannot usually be double-booked. This means that if two activities involving the same instructor, student or group are scheduled at the same time, the program considers this to be a conflict. For example, if you attempt to drag-and-drop an activity to a time when the instructor is already occupied by another activity, a warning will appear.
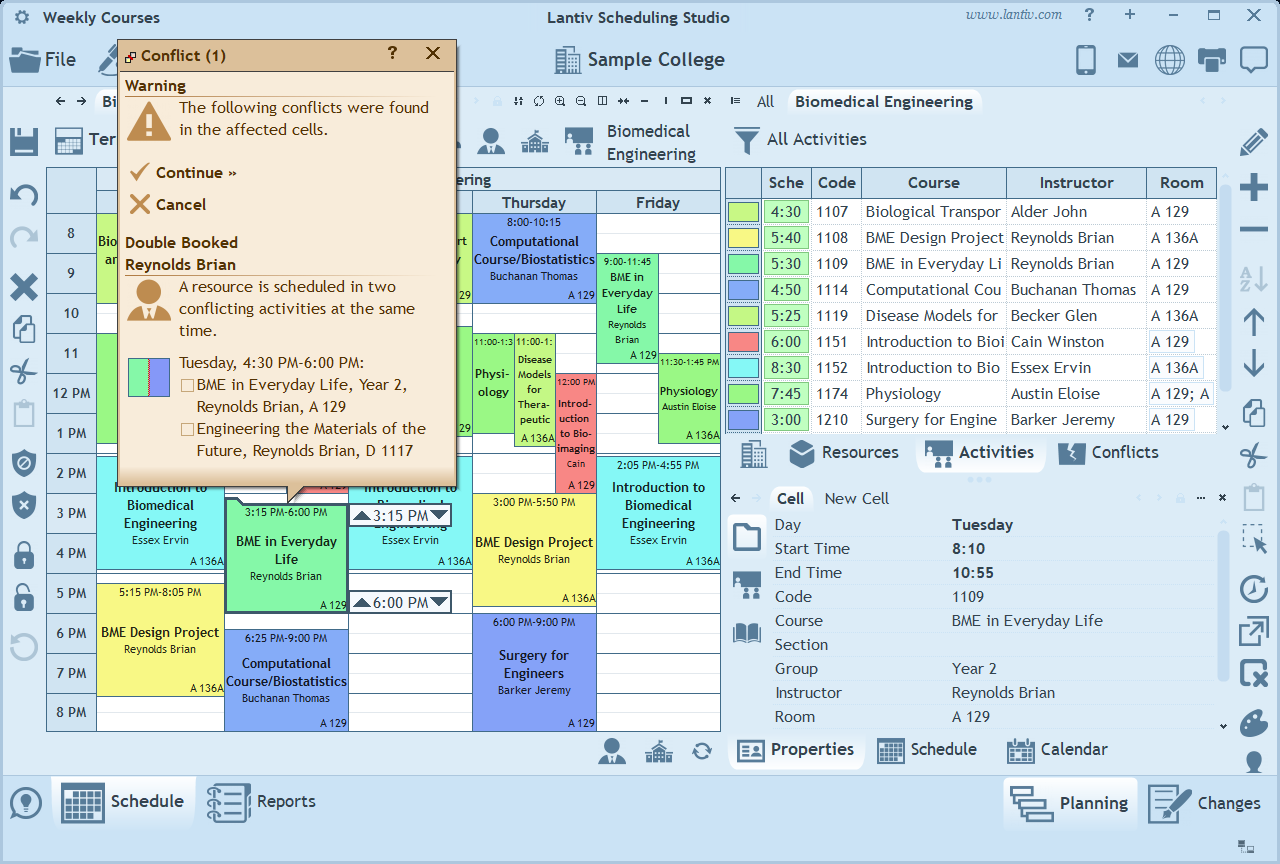
Double-booked room
A room is also not allowed to be double-booked by default (although this can be overridden for certain rooms, as explained below). If two activities are scheduled in the same room at the same time, a warning is displayed.
Room capacity
When an activity with more students than a room can accommodate is scheduled in that room, this is considered a conflict, and a warning is displayed indicating that the room's capacity has been exceeded.
Room distance
For any two rooms, buildings or campuses, it is possible to define a travel time — the time required to move from one location to another. Once this travel time is defined, the program tracks every pair of consecutive activities scheduled in different locations in a person's schedule, to ensure that the person has enough time to travel from one location to the next. For example, if a university has two buildings that are 10 minutes apart, scheduling two back-to-back activities of some instructor in those buildings without at least a 10-minute break between them is considered a conflict.
As described in the Scheduling chapter, you can block out certain times in a resource's schedule due to unavailability. Such blocks can be placed in the schedule of any resource (including courses). If you attempt to schedule an activity involving a resource that is blocked at that time, a conflict warning will be displayed.
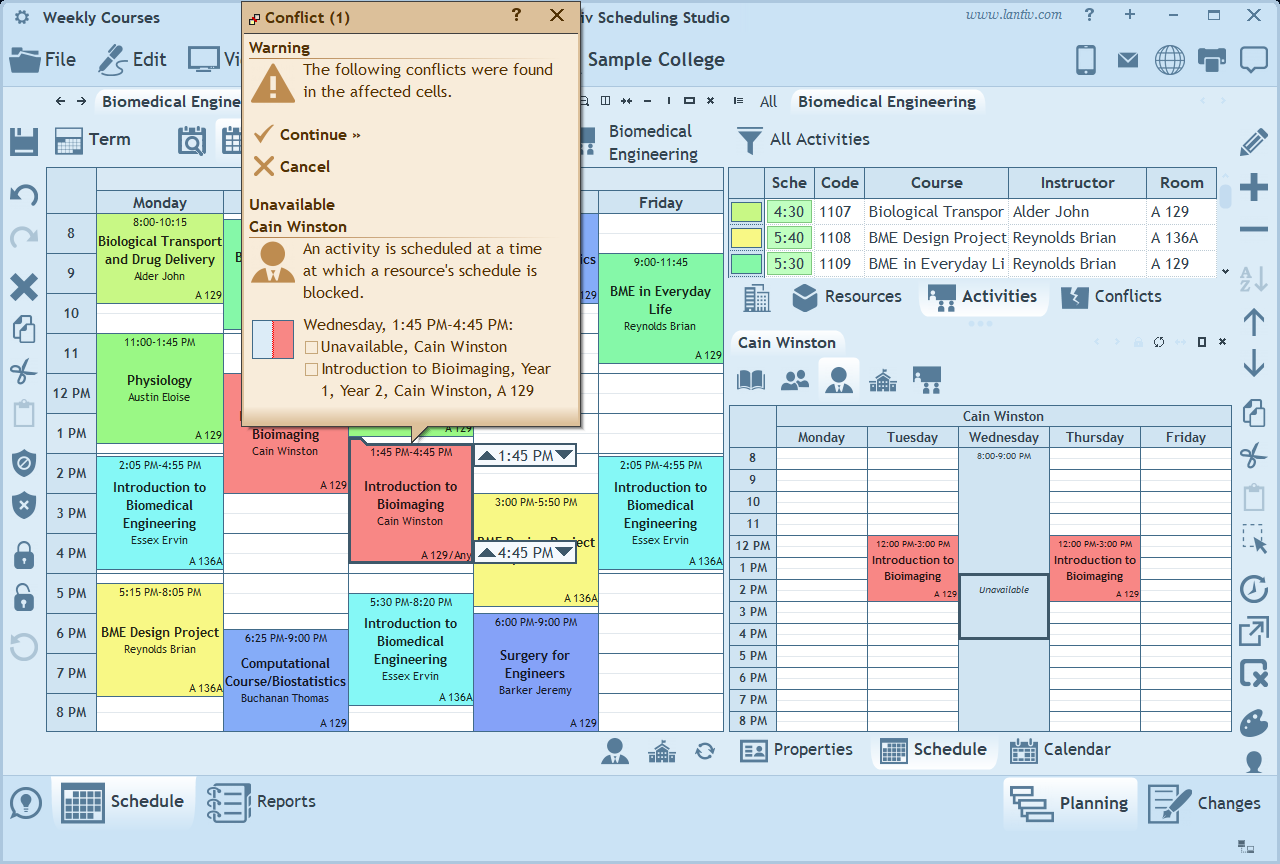
Overbooked activity
Activities have a Quantity property which defines the planned number of hours or periods for that activity to be scheduled during the week. If you attempt to schedule an activity for more hours or periods than its total planned quantity, a warning is also displayed.
Conflicts Window
Whenever the program detects one or more new conflicts as a result of your last operation, it displays a window called the Conflicts Window, which lists all newly detected conflicts. This is the window shown in all the examples above. The Conflicts Window gives you three options:
- The first is to cancel the last operation and return to the previous state — essentially undoing what you just did.
- The second option is to ignore the conflicts, complete the operation, and resolve the conflicts later at your convenience (note that you can always view these conflicts in the Conflicts pane, as explained below).
- The third option is to settle the conflicts immediately, directly in the Conflicts Window, by choosing which conflicting activities should remain scheduled and which should be deleted.
- Explanation: If you look at the Conflicts Window, you will see that conflicts involving two activities display those activities with a square check box to the left of each one. Clicking a check box tells the program that the corresponding activity should be deleted. A red "X" will appear in the check box, and the activity text will be shown struck through. If you click the "Continue" link at this point, all activities marked with a red "X" will be deleted.
Note: When working online and connected to a server, if one user is viewing the Conflicts Window, no other user can make changes until that user presses "Continue" or "Cancel". If another user attempts to perform an operation during that time, a message will be displayed asking them to wait until the first user finishes the operation.
Conflicts Pane
The Conflicts Pane summarizes all existing conflicts in the schedule. If you have ever clicked "Continue" in the Conflicts Window (without deleting the conflicting activities), the conflicts from that window will appear in the Conflicts Pane. The Conflicts Pane is located on the right-hand side of the workspace. To display it, click the "Conflicts" tab located next to the Activities tab.
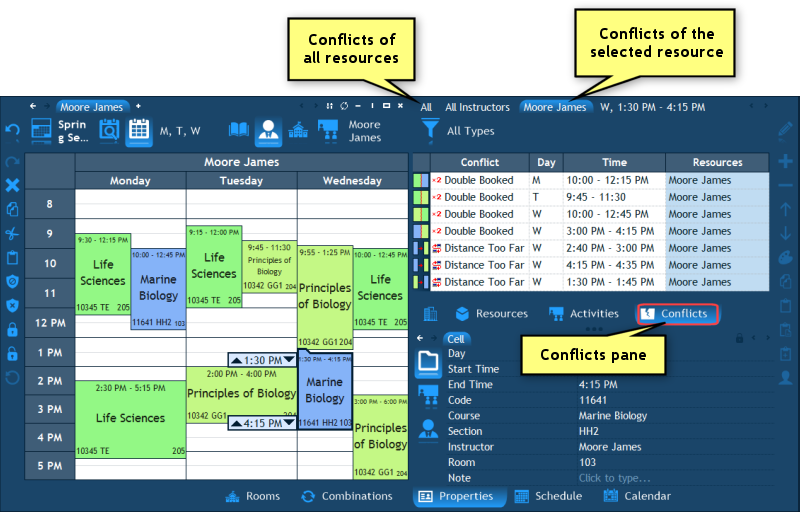
Important: By default, the Conflicts Pane displays only the conflicts related to the resource currently selected in the navigation pane. For example, if you are viewing an instructor's schedule in the main schedule pane, the Conflicts Pane will display only the conflicts involving that instructor. To display conflicts for all resources, click the All tab at the top of the Conflicts Pane.
In the list of conflicts, each row represents a single conflict. If you double-click a row, the program will open the schedule of the resource involved in that conflict and select the relevant cell.
The last tab above the Conflicts Pane shows the day and time currently selected in the main schedule pane. When you click this tab, only the conflicts for that specific day and time are displayed, while all other conflicts are filtered out.
If you want to display only conflicts of a specific type (for example, only double bookings), you can use the filter button above the list — the one that by default is labeled All Types.
Allowing Conflicts
By default, double-booking of people and groups is not allowed and triggers a conflict warning. However, there are cases where overlapping activities are intentional and should be allowed:
- Placeholder instructors – When an instructor's name is something like "TBD" and serves as a placeholder for instructors who will be assigned later, conflicts can be allowed. This prevents unnecessary warnings when the TBD instructor appears in overlapping activities that will eventually be assigned to different instructors.
- Groups that do not represent a fixed set of students – A group may represent an age group, program or another broad category rather than a specific group of students who always study together. Its activities may involve different subsets of students, particularly when individual students or subgroups are not explicitly entered into the program. In this case, overlapping activities do not necessarily represent actual student conflicts, so conflict warnings for the group can be disabled.
Each resource has a Conflicts property that controls whether the program tracks conflicts for that resource. This property has two possible values: Not Allowed and Allowed. If you set this property to Allowed, the program will stop tracking conflicts for that resource and will no longer display warnings when it is double-booked.
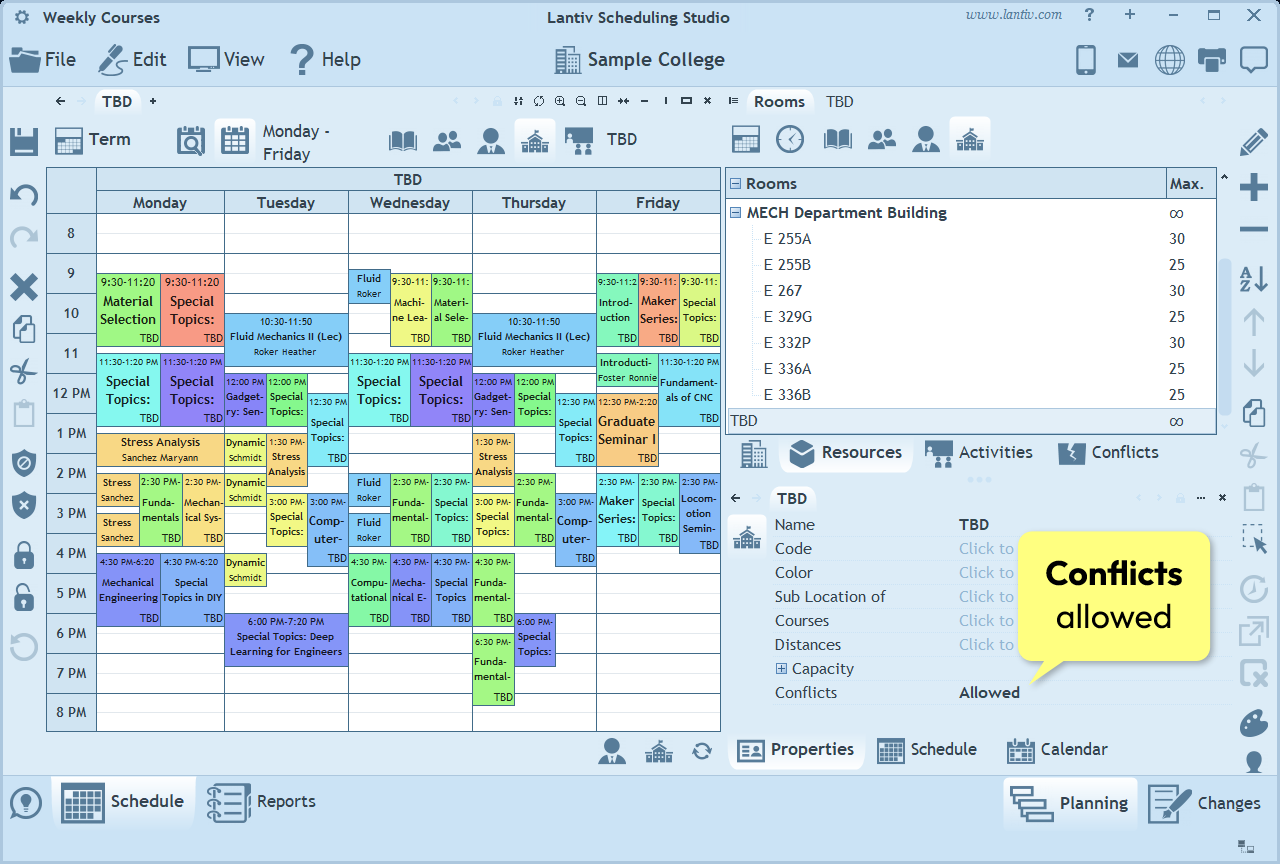
Allowing conflicts between specific activities
When several activities are intended to take place at the same time, it is recommended to combine them into a concurrent set. This allows the activities to be scheduled at the same time without triggering a conflict warning. For example, if an instructor teaches two sections of a course (or two related courses) that are combined for one or more sessions, the two sections can be combined into a concurrent set.
To combine several activities into a concurrent set, follow these steps:
- Select the activities in the activities list by clicking the first activity, then Ctrl+clicking the other activities.
- Click the plus button on the right-hand toolbar and select Set. This will combine all the selected activities into a set.
- In the Properties pane, change the set's Type property to Concurrently.
If the activities have already been scheduled, you can also combine them into a concurrent set directly from the schedule:
- Select the cells of the activities in the schedule.
- Click the Activity icon in the Properties pane (the second icon from the top on the left side of the pane).
- Click near the Set property and select New Set.
- Change the Type property to Concurrently.
Note: You can set "Concurrently" as the default set type. This is useful if you need to repeat the above process many times, as newly created sets will automatically be concurrent and you will not need to change their type each time. To set the default set type:
- Click the Institution tab (the tab with the building icon, to the left of the Resources tab).
- Click Properties at the top.
- Expand Set and select the Type property.
- Under the list, change Default Value to Concurrently.
Allowing conflicts between different sections
The Section property of activities can also be used to prevent certain activities from being considered conflicting. By default, the Section property does not affect conflict detection. However, in some cases, activities of the same course or group that belong to different sections should not be considered conflicting.
For example, different sections of a group may represent different subgroups of students, or different sections of the same course may be intentionally scheduled at the same time. In such cases, the program can be configured to treat activities belonging to different sections as non-conflicting, so that no conflict warnings are generated between them.
To configure this, follow these steps:
- Click the Institution tab, then click Properties at the top.
- Expand Activity and select the Section property.
- Below the list, select the appropriate option:
- • Different sections of a course may overlap
- • Different sections of a group may overlap
The next chapter: Changes.