Institution
Overall, data entry in the program is organized across three panes: the Institution pane, the Resources pane, and the Activities pane. You can switch between these panes using the tabs on the right-hand side of the workspace:
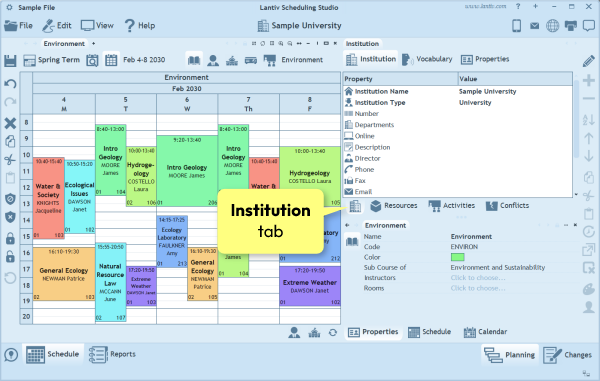
Note: The Institution pane tab does not have a title like the other tabs. This is because, after the initial setup, it is rarely used.
After you select the Institution tab, the toolbar at the top of the pane displays three icons, each corresponding to one of the three data entry pages in this pane. The first page contains details about the institution, such as its name and phone number. The second page defines the vocabulary used throughout the program to refer to different types of resources (e.g. Subjects or Courses). The last page contains custom properties for resources—additional data fields that you can add as resource attributes (for example, a salutation field for instructors).
In essence, the Institution pane lets you customize the software. While the program is designed to be generic and suitable for many types of educational institutions, it can be adjusted to feel as though it was made specifically for your needs.
Institution Details
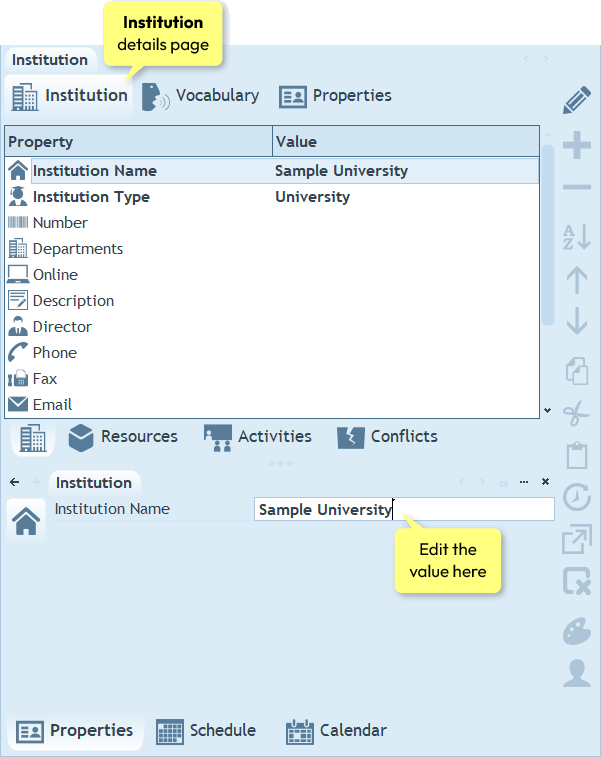
The first page in the Institution pane is the Institution Details page. It contains general information about the institution, such as its name, director, telephone number, fax, address, and notes. There are two ways to edit these fields: by using the Properties pane or by toggling on the Editing mode.
How to edit the fields using the Properties pane?
To edit a field, first click on it. Then look at the Properties pane below the Institution pane. The Properties pane will display the selected field and allow you to edit its value. To edit a value in the Properties pane, click on it and then type a new value (or select one when applicable).
When you finish editing, press Enter on the keyboard or click anywhere outside the edit field. This applies the value you entered.
How to edit the fields using the Editing Mode?
In general, most editing in the program is done through the Properties pane in the bottom-right corner of the workspace. However, there is another way to edit the fields shown in lists: by enabling Editing mode. You can turn on Editing mode by clicking the pencil button in the top-right corner of the screen. When Editing mode is active, clicking an item in a list lets you edit it directly. For example, with Editing mode enabled, you can click the value column next to the Institution Name field and edit the value directly in the list.
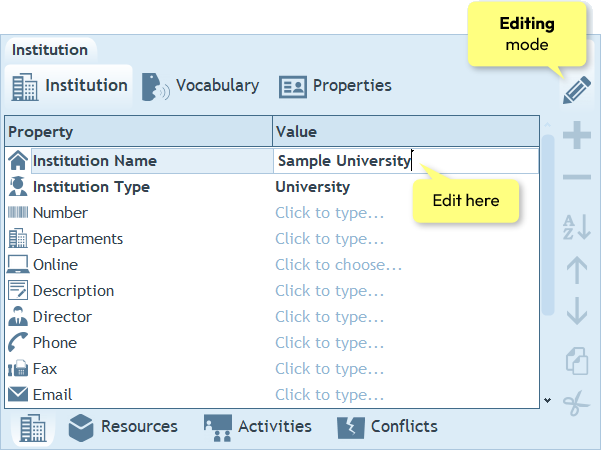
Editing mode is especially useful when working with many resources or entering many activities, as explained later in this user’s guide. To exit Editing mode, click the pencil button again. This turns the mode off.
What does the Institution Type affect?
The Institution Type field determines how the program initializes its default vocabulary, resource icons, and certain system defaults throughout the user interface. Depending on the selected type, the program applies appropriate presets. For example, when University is selected, Subjects are renamed to Courses, a calendar-based schedule is created, and a default hourly time scale is initialized.
As mentioned earlier, these changes affect only the defaults—you can modify everything later as needed. Select the institution type that most closely matches yours. If none of the listed types apply, leave the setting as Generic, then proceed to the Vocabulary page to adjust the terminology to your preference, and to the Resources pane to enter the term's start and end dates (for a calendar-based schedule) or its generic days (for a recurring schedule).
Vocabulary
The Vocabulary is the second page in the Institution pane, and it lets you define the phrases used throughout the program to refer to different types of resources. For example, the resource type Subject can be renamed to Course, Module, Theme, and so on. You can specify both the singular and plural forms of each phrase. In addition, you can change the icon associated with each resource type. Any changes you make to the vocabulary affect both what is shown on screen and what is printed or exported.

How to edit the phrases?
As with the Institution details page, the Vocabulary can be edited either through the Properties pane or by enabling Editing mode using the pencil button in the top-right corner.
How to customize the icons?
Icons can be customized in the same way as text. To change the icon associated with a resource type, click the Icon field in the Properties pane and select a new icon from the pop-up list. Each resource type has several icons for you to choose from.
What if my institution does not use some type of resource at all?
In many institutions, not all resource types need to be scheduled. For example, some institutions do not schedule equipment, while others do not schedule individual students. In such cases, the best approach is to disable the unnecessary resource types so that their icons, buttons, and lists no longer appear anywhere in the program. You can do this by clearing the checkbox next to the resource’s name in the Vocabulary list.
Custom Properties
By default, the program’s database includes only the minimal information required for scheduling. Each resource has a name, a code (ID), an associated color, and a few additional attributes. These additional attributes are optional and can be enabled or disabled as needed. For example, some institutions need to specify the maximum capacity of rooms, while others do not. Similarly, some schools use section numbers for activities, while others do not. All of these optional properties are available in the program and can be enabled on the Properties page of the Institution pane.
Furthermore, to let you extend the program and store any additional information you need for resources, the program supports custom user-defined properties. Custom properties are text fields that are saved in the database for each resource. These fields can be displayed in lists throughout the program, within the timetable itself, in printouts, in reports, and in exported data.
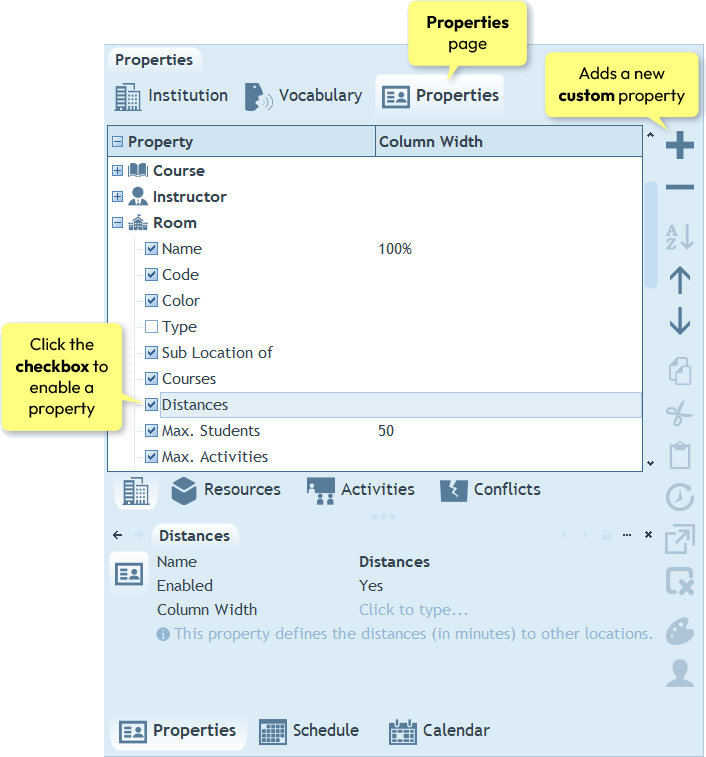
When you switch to the Properties page, you will see a list of all resource types. Expanding a resource type displays all of its properties. To enable a property, click the checkbox next to its name. To rename a property, select it and enter the new name in the Name field below the list:
How to add a user-defined property?
To add a new property, first select the resource type to which you want to add it by clicking on the resource type. Then click the plus button on the right-hand toolbar and choose Property from the pop-up menu. Once the new property is added, you can define its name and column width (if needed) in the Properties pane, located below the Institution pane.
How to display a property in a column in the resource list?
To display a property in the resource list, set its Column Width to any value greater than zero. This applies to both predefined program properties and custom user-defined properties.
Column width can be specified either in pixels or as a percentage. For example, to set a column width of 50 pixels, enter "50". To make the column occupy half of the total list width, enter "50%". Once set, the property will appear in the resources list, and you will even be able to edit its values using the Editing Mode.
How to delete a user-defined property?
To delete a property you have added, select it and click the minus button on the right-hand toolbar. Note that predefined properties cannot be deleted. If a predefined property is not relevant for your institution, you can disable it by clearing the checkbox next to its name. Once disabled, the property will no longer appear anywhere in the program.
The next chapter: Resources.