Reports
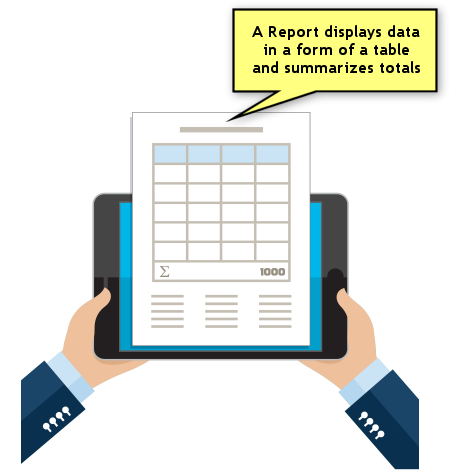
A Report is a table of rows and columns which displays and summarizes various types of data extracted from the file you are working with. All reports can be printed or exported to various formats (most common are PDF or CSV text file).
Contents
How to switch to the reports module?
The Reports module can be accessed by clicking the "Reports" tab at the bottom left corner of the workspace:

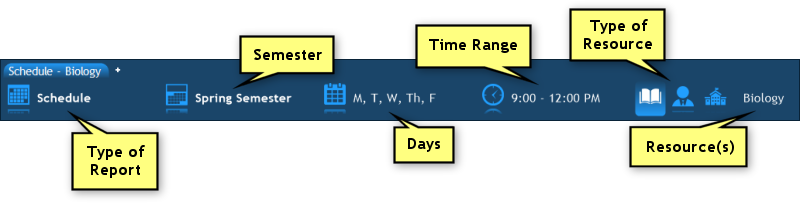
Just like in the "Schedule" module, Reports also have a navigational pane at the top. In that pane you can select the type of report to display, the days and times to include in the report, the type of resources for which to generate the report and, if necessary, select the exact resources as well.
Types of Reports
The top left selector in the navigation pane is used to select the type of the report:
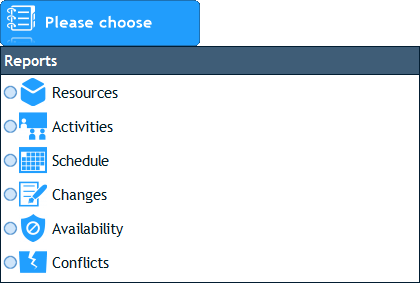
Let's go over each type and see what information it displays.
Resources
This report shows a list of resources just like in the Resources pane. You can control which properties of a resource are displayed (similarly to how you select the columns to display in the Institution pane's Properties page). For example, you can use this report to generate a list of students with their addresses, emails and more.
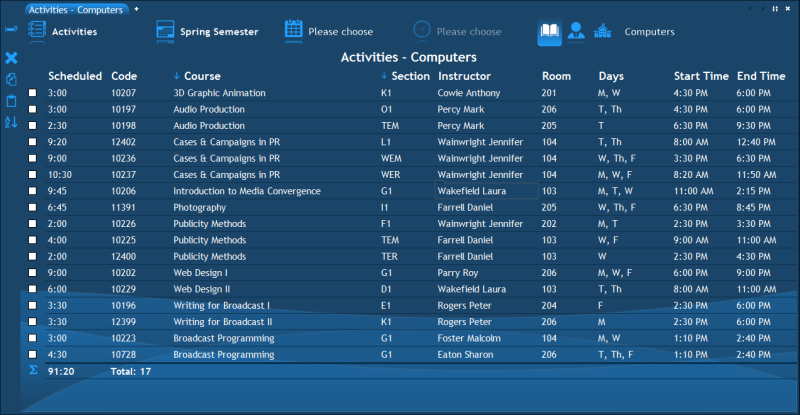
Activities
This is a report which lists the activities in the same way as how they are presented in the Activities pane – each row contains the details of a single activity and the columns are the different types of resources participating in the activity.
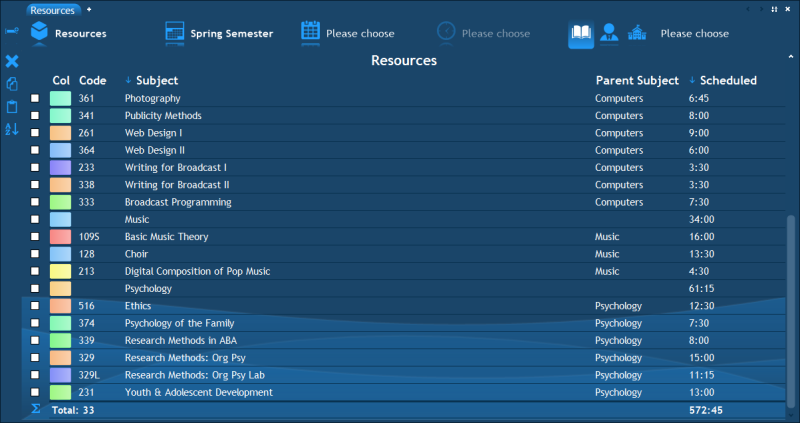
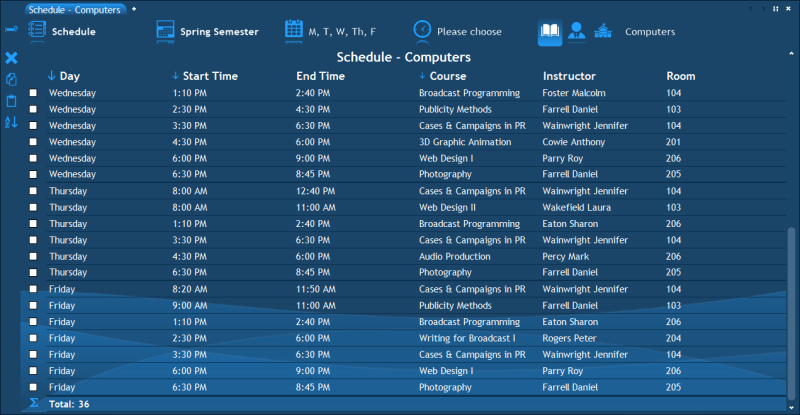
Schedule
The "Schedule" report is probably the most important report because it lists all the actually scheduled occurrences of activities. Each row in the report corresponds to a single cell in the schedule. The columns of the report are all the resource types, as well as "Day", "Time" and "Note". The navigation pane above the report can be used to narrow down the coverage of the report to only specific days, start/end times, periods and resources.
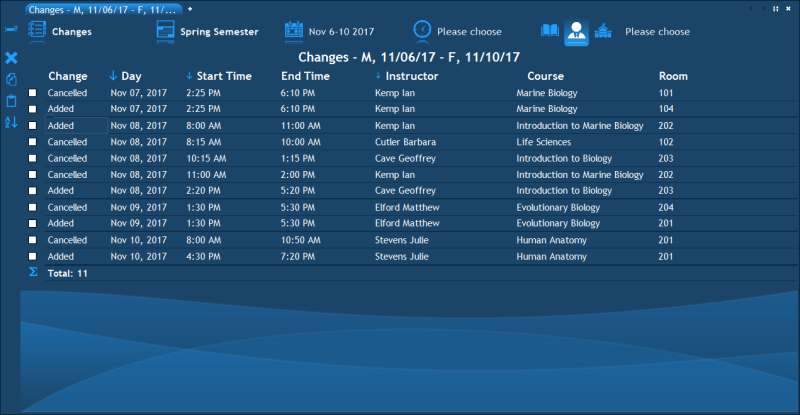
Changes
The "Changes" report shows similar information to the one displayed in the Changes pane. It displays the cancelled, added and changed cells with all the affected resources, sorted by day and time. The navigation pane can be used to select the days, times, periods, and resources to be included in the generated report.
Availability
This report lists all the resources of a certain type together with their availability information: whether they are available (free), scheduled (booked) or unavailable (blocked). The day(s) and time(s) are selected in the navigation pane.

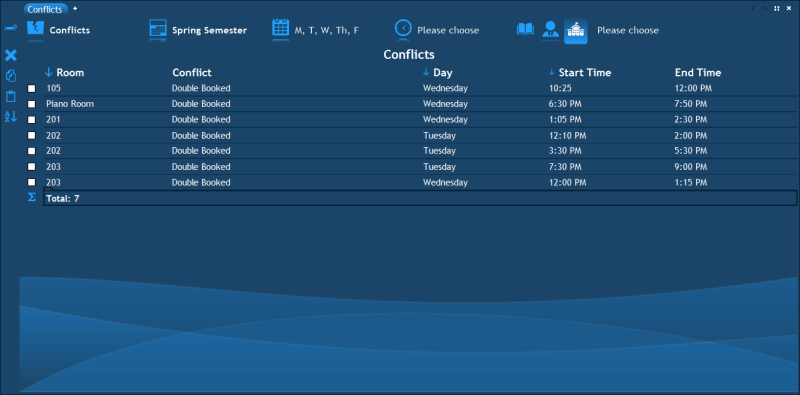
Conflicts
This report displays all the existing conflicts in the schedule similarly to the Conflicts pane. Each row displays a single conflict. The "Conflict" column contains the type of the conflict, the "Day" and "Time" columns display when it occurs and the resource column is the name of the resource in whose schedule the conflict exists.
Report's Layout
A report's columns and layout can be customized if you select "View", "Settings" in the main menu (while in the Reports module).
Each report has its own columns and settings, so if you modify these settings while viewing one type of report, it will not affect the settings of another type of report.
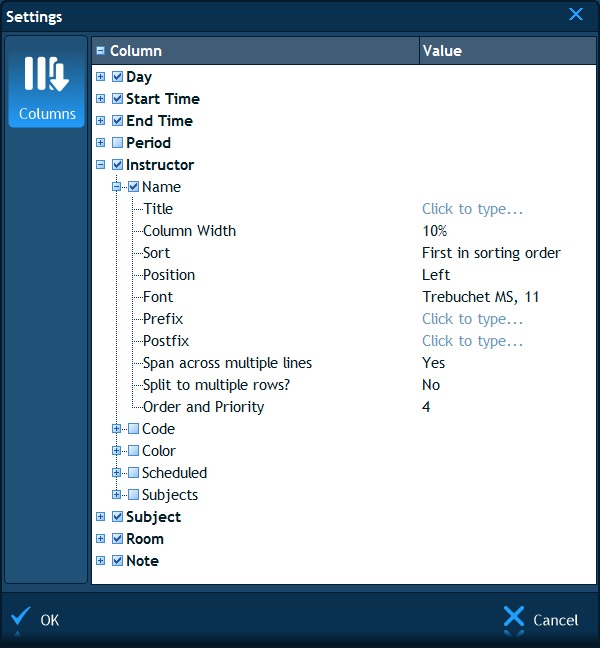
The settings window lists all the available types of data which the report can show. Most types are simply different types of resources, but some are informational columns like "Quantity" (of hours or periods), "Start Time" of a scheduled activity and more. Custom properties that you have entered in the Institution pane are also available here. Each report has its own relevant data. The selections you make in this window determine the columns that you will see in the report, their ordering, sorting and formatting.
In order for a column to appear in a report you need to select the check box which is located to the left of the column's name. If you expand a column's item (using the "plus" button near the check box), you will see a series of settings which affect the appearance of the column in the report. Here are the available settings.
- Title – The title of the column as it appears at the top of the report. If this field is left empty, the title is the property's name. If you need it to be something else, you can type the new title's text here.
- Column Width – The size of the column, either in pixels or in percentage. If you append the percentage symbol "%" (e.g. "10%"), the size is in percentage, otherwise it's in pixels.
- Sort – The report allows 3-level sorting, which means that you can have the report sorted by up to 3 columns. This field determines whether the current column is one of these 3, and which one. The available options for this field are: "First in sorting order", "Second in sorting order" and "Third in sorting order".
- Position – The horizontal alignment of all text in this column. The available options are: "Left", "Center" and "Right".
- Font – The font and the font's size which are used to display the text in this column.
- Prefix – Allows you to type certain text which will be appended to the beginning of each row's contents in this column.
- Postfix – Same as the prefix, only this text is appended to the end of each row's contents.
- Span across multiple lines? – This field controls whether long text is cut off or spanned over multiple lines. If this value is "Yes", cells with long text will become larger in height to ensure all text is visible.
- Split to multiple rows? – By default, if a field in a report contains multiple resources, they are all written in the same cell, separated by commas. For example, if an activity involves several instructors, they will all be shown in the same cell like this: "Instructor A, Instructor B, Instructor C". However, if this field is set to "Yes", this activity's row will be split to 3 separate rows, each listing only one instructor.
- Order and Priority – The position of the column in the report (left to right). For example, if this value is "2", this will be the second column in the report.
All reports can be printed or exported (to a CSV file for example) by selecting "File", "Print/Export" in the main menu. The next chapter explains how exactly that is accomplished.
The next chapter: Printing and Exporting.